Showing posts with label paper. Show all posts

Tuesday, March 25, 2014

7 Great Crafts for Spring


Spring is finally here (even though it doesn't quite feel like it everywhere). Get yourself in the spirit either way by making some of these cute Spring crafts. :)


Make some paper flowers. No matter what flower is your fave, you can find a paper variety to whip up on a weekend.


If gardening is your thing, these fabric covered flower pots are sure to brighten up your space. I love them as part of my tiny windowsill garden.


I saw these adorable bees over on The Experimental Home. Use your leftover plastic Easter eggs to whip up a hive full of them :)


These dinosaur garden markers were one of my favorite garden projects ever. They add whimsy and color to your garden while you are waiting for everything to sprout!


April showers bring May flowers, so you might as well join in the fun with a rain cloud brooch. If storms are more your style change it up with a cloud + lightning brooch instead.


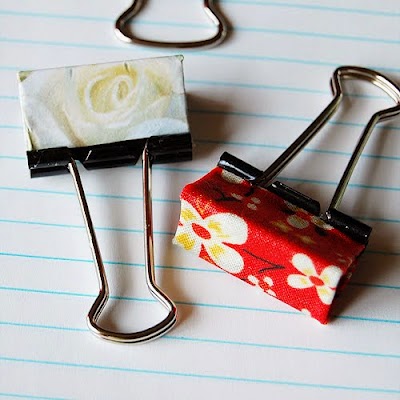
Don't forget to brighten up your office with some candy colored binder clips. Some clips, glue and scraps of paper or fabric are all you need!

Take a few minutes and make some bright Spring stationery! These cards are super easy and will brighten anyone's day when they open the mail.

What are your favorite Spring crafts?


Sunday, November 17, 2013

Gift Bow Roundup


The holidays are fast approaching, and there is no better time to start making a batch of your very own handmade gift bows! I found the awesome sweater patterned paper above in a photorealistic package of papers and had to make some snuggly bows of my own. Below you will find a big list of options to choose from (and many can be completed by using fabric, felt or Ribbon instead of cutting paper). Settle down with a great holiday movie and some paper and whip up a stack of ribbons this week!

Paper Bows from How About Orange


Accordion Fold(Snowflake)Bows


Small Gift Bows


Jumbo Gift Bows


If flowers are more your style, you can check out these paper flowers or some easy tissue paper flowers. Happy Wrapping!


Sunday, September 8, 2013

Fish Scale Patterned Paper Placemat


This is an easy project that is extra eco-friendly. I used a 2" hole punch to punch out circles from an old magazine and then pasted them onto an extra sheet of 12"x12" card stock. Even the glue was eco-friendly! I used Glu6 craft paste from Nine Lives Products, it is a new craft glue that is made from recycled styrofoam, how cool is that!? They make a few different glue products, all from styrofoam, you should definitely give them a try. The glue even smells kind of good, it reminded me of Gojo orange pumice hand cleaner, which all of my art classes used to have for us to use (elementary school and up). Totally nostalgic.


Start by punching out lots of circles from a magazine. I used an old fashion magazine, which had lots of super colorful ads and whatnot for great variety of small images, but any magazine should do the trick. You could also add in some newspaper images as well, but the ink on newspaper tends to smudge a bit.


I started at the bottom of my sheet of card stock and worked my way up to create this fish scale pattern. Your very bottom layer will use half circles. You could use a smaller or larger hole punch if you want, just make sure the size will fit evenly on your paper (since my paper is 12" wide, anything that divides evenly into 12 would work without needing to trim the paper).


Above you will see the finished starting row of my scales. To start the second row, choose a side to work from and you will again start with a half circle, as the fish scale pattern is staggered by an inch. The circles that are not on the ends will be full circles.


Continue your pattern up the sheet of card stock, as shown above. I tried to evenly disperse circles with lots of detail with circles that had solid color so that no one area was extra busy while one area was too plain, but overall it's a pretty colorful piece of work. Once your glue is dry you can coat this with a top coat or clear sealant. If using this for a place mat isn't your style, it would also make a great piece of wall art, or could be cut up into coasters. I'm thinking about lining the drawers in my craft desk with something like this!


Glu6 craft paste sample provided by Nine Lives Products, manufactured in the USA (CA). All opinions are my own.


All Craftinomicon readers can get 25% off their Glu6 order at Nine Lives Products by using coupon code Fall2013 at checkout until October 31st!

Tuesday, June 12, 2012

Paper Gerbera Daisies


My favorite flower is probably a gerbera daisy. I love the bright colors they come in, they seem to last quite a long time in a vase compared to other varieties, and something about them is just plain fun. I have been working on a pattern to make some out of paper for quite awhile, and came close to finishing it up for a Craft Wars challenge, but decided to hold off and work on it a tiny bit more to make sure it was just right. Here are my results, let me know what you think!

To make your own paper daisies you will need:

Paper of choice (I used a magazine)
Scissors
Daisy Petal Template
wire stem
glue
Decorative button
floral tape (optional)


I started by making a template for my petals. Since cutting these out gets rather time consuming (or maybe it's just the fact I always cut these out while doing something else like watching a movie?) I opted to go with only 3 different sizes of petals, cutting 2 of each size to make one flower. You could certainly play with the size on your computer/printer to get more like 5 or 6 different sizes of petal templates and use smaller petals in place of a button center, as I used.


I've never seen a flat daisy, so I used my scissors to gently curl each petal a little before gluing my edge tab under. As this daisy is made with magazine paper, not much pressure is needed, and you want to be careful not to tear your petals, as they did just take you awhile to cut out. I will mention, these work pretty great with vellum papers -- I'll get photos of the one I attempted and post it later on, but the fact that these only make a slight cone shape in the center once assembled makes them work well with thicker papers as well as thin.


I found these great flower shaped buttons and decided they'd look great with my flowers. You could use just about any button you like, or if you don't like the button look, attach your button to your floral wire stem, then cover it with a little batting and wrap it in your favorite fabric or some tissue paper.


Then start adding your petals on (you will need to poke a small hole in the center of each one before putting it on the wire), arrange them as you like (you may need to add a little glue between each layer of petals to help them stay in place) and wrap the stem in floral tape if you want. I always wrap mine with tape as I think it look nicer, but it is not necessary.

If you want to check out more handmade crafts and recipes, visit this link party at Frugal By Choice, Cheap By Necessity.

Tuesday, June 5, 2012

Polka Dot Table Runner


I've been trying to come up with ways to keep myself from turning my dining room table into a catch all. Every tie I clean it off, it seems within seconds to be covered again by mail, craft projects, to do lists and more. So far my best defense has been trying to keep some kind of decoration on it, but a centerpiece isn't always good enough. So the other day I thought up this table runner! It's so cheap and easy to do, that you could change it almost every day if you wanted. It would also be super cute as a party decoration!


To make your own all you need is:

Scrap book paper or Card stock (here I used card stock)
Large circle hole punch (you could use a fancier shaped punch if you prefer)

That's it! Two supplies! How great is that? I will also point out that as long as you don't feel the need to attach these to a backing of some sort, you can re-use your punch outs in several other crafts later on :)


I am addicted to ombre color schemes lately, so I chose several shades of orange for my runner, but you could use any combo of colors or patterns. Start by punching out your polka dots. I punched out about 3 12"x12" card stock sheets worth of dots for my table (53" in diameter). You could also arrange your dots in a sunburst pattern, in which case you'll likely need more dots. Experimentation is key here, and you can't mess up!


Once you have your dots punched out, arrange them as you see fit! I started with my white dots on one side spaced pretty far apart, and then went to light orange, orange and dark orange. PLay with your spacing and colors until you come up with what looks best for you and your table.


In the end, I couldn't resist adding my ombre pom pom centerpiece as well. Complimentary colors make me feel all warm and fuzzy inside.

Sunday, March 25, 2012

Mad For Plaid


Just a quick post to show off for you some roses I made for a friends fundraiser last night, so she could give them to some sponsors. The theme was "Mad for Plaid" and I had the good fortune of finding several different plaid patterned scrapbook papers. Now I am convinced that these roses look amazing no matter what pattern your paper has.

Why didn't nature come up with plaid roses? Beautiful!


Monday, December 12, 2011

Giveaway Day


Welcome to the Craftinomicon! It is time once again for Sew Mama Sew's Giveaway Day! Above you will see a glimpse at my main prize this year: a quarter pound of fabric scraps (This is about 35 separate scraps of fabric)! These scraps are various shapes (mostly rectangles), sizes and colors, all cotton. Part of the fun will be sorting through them all when you receive them! Not sure what to do with them? I will be featuring projects on The Craftinomicon all week using fabric scraps!

Giveaway Details:

This giveaway is open to U.S. residents only.
All entries must be received by Friday, December 16th at 5pm, PST
One entry per person, please.
Please make sure to leave an email so I can contact you should you win.
To enter simply leave a comment on the bottom of this post answering the following question: What is a favorite handmade gift that you have given or received? This doesn't have to be holiday related, it could have been a birthday, anniversary or "just because" gift as well.


Thank you to all who entered! A winner has been chosen and it is Lorraine:

lorraine said...

all my favorite things ive received have been handknit items..right now im loving the cowl a friend of mine made me :)


Congratulations Lorraine, I have sent you an email and am packaging up your prize right now!