Showing posts with label easy. Show all posts

Thursday, May 8, 2014

Last Minute DIY Ideas for Mom


Hey all! With Mother's Day fast approaching, I know some of you may be at a loss of what to get or make for mom (or maybe you need some ideas of what the kids can make for mom/grandma, etc). Here is a list of some super easy last minute gifts to bring a smile to any mom's face. Happy Mother's Day!


Make mom a long lasting bouquet of paper flowers. There are so many varieties to choose from, and you can use any colored or patterned paper you like! Tailor make some polka dotted daisies or striped roses in mom's favorite colors :)


Make a cute geometric heart card or framed wall art with this tutorial from Ludorn (In German and English).


Make some gem shaped shrink plastic earrings (or charm bracelet, or necklace) with this awesome tutorial from Minted Strawberry.


Whether mom has a green thumb or not, these succulents in painted ball jars will be a great fit! The gals at Lolly Jane even have printable gift tags for you to use!


Have a lot of mom's in your life? You can whip up a huge batch of these bath salts and put them in cute containers to gift to everyone! Bonus points if you scrub the bathroom for mom before gifting these to her!

Happy Mother's Day!


Monday, April 7, 2014

DIY Beeswax Tart Candles


I've been working on some craft ideas that would make cute little gifts lately (you know, wedding season is fast approaching). These cute little candles fit the bill! I used mini tart pans from the kitchen goods store in my neighborhood (about 50-60 cents a piece) as the containers for my candles. The wicks, wax and honey almond scent are from Bulk Apothecary, they aren't paying me for saying that- I just really like ordering my candle making/lotion making supplies from them, they have all kinds of awesome stuff.

To make these candles at home you will need:


Beeswax (If you can find it in the tiny pellets, I recommend it. Grating whole blocks of wax is tedious)
candle wicks
containers (I used mini tart shells)
Fragrance oil (optional) Beeswax does have a subtle scent on its own, and you certainly don't need to scent your candles if you prefer them to be more plain
Glass bowl* (to create a double boiler)
stirring utensil* (I use a plastic spoon)

*I always recommend that you use a bowl and spoon for making candles/beauty products that you do not eat with. I got a pack of plastic spoons as well as a glass bowl at the dollar store. I always hand wash these items and keep them separate from the dishes we eat with.


To start, I measure out my wax pellets. I wanted my tart shells to be pretty much full, so I filled each tarts hell I was using so it was heaping with pellets and dumped them into my glass bowl. I then added a couple extra Tablespoons of pellets just in case any got spilled when filling my candles.

I had ordered a large quantity of 3" long wicks, so I trimmed them a bit before placing them in the tart pans (to about 1.5"). Once the candles are done, you can trim the wicks further if needed.

Place your glass bowl of wax over a pot of simmering water. This will slowly melt the wax. You will want to stir the wax until it is all melted and then add any fragrance if you wish to do so. I added about 12 drops of fragrance for my 3 small tart candles, but if you like a stronger fragrance you can add more.

Once the wax is melted and the fragrance has been stirred in, you can start to fill your candles. I always place the objects I am filling on top of some freezer paper and/or an old towel in case I spill any wax while pouring. Cleaning wax off a table or counter top is a huge hassle. If your candle mold is small, like mine, you may want to use a spoon to spoon the hot wax into your mold (I also found some measuring cups that have a little spout on one side that work well for pouring the wax--again, I do not use these for any other cooking). I always fill my molds up to the top, as the wax settles just a tiny bit when cooling.


Once the wax has cooled and hardened, I trim my wicks so they are about 1/4" long. You are ready to wrap these up as a gift or use them around the house! These would be a great wedding or baby shower favor, and the materials can be bought in bulk online.


What are your favorite little gifts to make yourself?


Tuesday, March 25, 2014

7 Great Crafts for Spring


Spring is finally here (even though it doesn't quite feel like it everywhere). Get yourself in the spirit either way by making some of these cute Spring crafts. :)


Make some paper flowers. No matter what flower is your fave, you can find a paper variety to whip up on a weekend.


If gardening is your thing, these fabric covered flower pots are sure to brighten up your space. I love them as part of my tiny windowsill garden.


I saw these adorable bees over on The Experimental Home. Use your leftover plastic Easter eggs to whip up a hive full of them :)


These dinosaur garden markers were one of my favorite garden projects ever. They add whimsy and color to your garden while you are waiting for everything to sprout!


April showers bring May flowers, so you might as well join in the fun with a rain cloud brooch. If storms are more your style change it up with a cloud + lightning brooch instead.


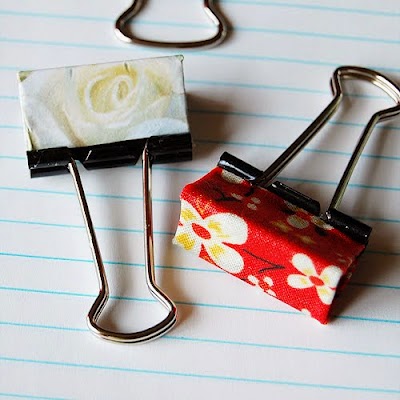
Don't forget to brighten up your office with some candy colored binder clips. Some clips, glue and scraps of paper or fabric are all you need!

Take a few minutes and make some bright Spring stationery! These cards are super easy and will brighten anyone's day when they open the mail.

What are your favorite Spring crafts?


Wednesday, March 19, 2014

Peanut Butter Pie


I'm a teeny bit obsessed with peanut butter pie at the moment. It started when we grabbed some for dessert at one of our favorite restaurants a couple weeks ago. Since then I have been scouring the interwebs for recipes, below you will find my fave which is a mish mash of a couple recipes I have found and enjoyed!

For Crust:
8 ounces chocolate cookies
4 tablespoons butter, melted

For Filling:
1 cup heavy cream
8 ounces cream cheese (I used 1/3 fat cream cheese, because the heavy whipping cream makes me feel guilty)
1 cup creamy-style peanut butter
1 cup powdered sugar
1 – 14 ounce can sweetened condensed milk
1 teaspoon vanilla extract
1 teaspoon freshly squeezed lemon juice


First, add the cookies to the bowl of a food processor and pulse into fine crumbs (I used dark chocolate Fudge Stripe cookies-yum!). Combine melted butter and cookie crumbs in a small bowl, and stir with a fork to mix well. Press mixture into the bottom and up the sides of a 9-inch pie pan. I decided I wanted to make 3 smaller dishes of this pie, so I distributed my crust evenly between 3 ramekins about 5 inches in diameter. I still had plenty of filling for all three!

Next, pour the heavy cream into a bowl and beat using a stand mixer or hand mixer until stiff peaks form. I put my bowl in the refrigerator as I find this helps speed up the process a little bit. Store in refrigerator until ready to use. Place the cream cheese and peanut butter in a deep bowl, beat on medium speed until light and fluffy. Reduce speed to low and gradually beat in the confectioner’s sugar. Add the sweetened condensed milk, vanilla extract and lemon juice. Increase speed to medium and beat until all the ingredients are combined and filling is smooth.

4) Stir in 1/3 of the whipped cream into the filling mixture (helps lighten the batter, making it easier to fold in the remaining whipped cream). Fold in the remaining whipped cream. Pour the filling into the prepared pie pan. Top with a drizzle of melted chocolate on top (or if you are like me put more cookie crumbs or pieces of these cupcakes leftover from Husband's birthday on top), and refrigerate for three hours or overnight before serving.


Sunday, February 23, 2014

Make Your Own Constellation Notecards: 3 Ways


I love fancy notecards. I'm always drawn to fancy card and paper stores, but the costs can really add up on fancy cards with all the glitz and glamour. These constellation notecards are super easy to whip up, and don't take tons of materials (I even got some of my items on sale!).


To make your own constellation notecards you will need:

Black or midnight blue cardstock (I used 8.5"x11" sheets)
scissors or small paper cutter
ruler (unless you have a paper cutter with built in ruler)
small self adhesive gemstones
silver metallic pen or marker (I used a Sharpie silver metallic permanent marker)
pencil
needle
print outs of your favorite constellations (I did am image search on Google to find mine)

I started out by cutting my black cardstock sheets into cards. You can easily make 2 cards out of each sheet, and cut individual cards to different shapes if you like. A good standard size is 4 1/4" x5 1/2 inches for the final card (which can be done by cutting your original sheet of paper in half and then folding to make your card).


Next, use a needle to poke small holes in your constellation design where the stars are located, as show above. I then positioned my deisgn on my card and used a very sharp pencil to lightly mark out where my stars are. :)


For my first card, I stuck small self adhesive gems where all of the stars are located. I like the look of this one a lot, but if you are giving these away to someone that isn't very familiar with constellations, you might want to try the outline method.


For this card, I still made the pencil dots to mark where my stars go. Instead of placing my sticker gems, I connected the dots with a metallic silver marker. I let each segment sit a minute or two to make sure I didn't smear my marker lines. This shows the outline of the entire constellation and makes it more recognizable.


My favorite option is the third card, which combines the outline with the gemstones. I did my outlining first, then stuck a gemstone where each star is located. Quick and easy and something I am sure would brighten someone's day.

Have you sent anyone something special yet during National Letter Writing Month?