Showing posts with label baby shower. Show all posts

Monday, April 7, 2014

DIY Beeswax Tart Candles


I've been working on some craft ideas that would make cute little gifts lately (you know, wedding season is fast approaching). These cute little candles fit the bill! I used mini tart pans from the kitchen goods store in my neighborhood (about 50-60 cents a piece) as the containers for my candles. The wicks, wax and honey almond scent are from Bulk Apothecary, they aren't paying me for saying that- I just really like ordering my candle making/lotion making supplies from them, they have all kinds of awesome stuff.

To make these candles at home you will need:


Beeswax (If you can find it in the tiny pellets, I recommend it. Grating whole blocks of wax is tedious)
candle wicks
containers (I used mini tart shells)
Fragrance oil (optional) Beeswax does have a subtle scent on its own, and you certainly don't need to scent your candles if you prefer them to be more plain
Glass bowl* (to create a double boiler)
stirring utensil* (I use a plastic spoon)

*I always recommend that you use a bowl and spoon for making candles/beauty products that you do not eat with. I got a pack of plastic spoons as well as a glass bowl at the dollar store. I always hand wash these items and keep them separate from the dishes we eat with.


To start, I measure out my wax pellets. I wanted my tart shells to be pretty much full, so I filled each tarts hell I was using so it was heaping with pellets and dumped them into my glass bowl. I then added a couple extra Tablespoons of pellets just in case any got spilled when filling my candles.

I had ordered a large quantity of 3" long wicks, so I trimmed them a bit before placing them in the tart pans (to about 1.5"). Once the candles are done, you can trim the wicks further if needed.

Place your glass bowl of wax over a pot of simmering water. This will slowly melt the wax. You will want to stir the wax until it is all melted and then add any fragrance if you wish to do so. I added about 12 drops of fragrance for my 3 small tart candles, but if you like a stronger fragrance you can add more.

Once the wax is melted and the fragrance has been stirred in, you can start to fill your candles. I always place the objects I am filling on top of some freezer paper and/or an old towel in case I spill any wax while pouring. Cleaning wax off a table or counter top is a huge hassle. If your candle mold is small, like mine, you may want to use a spoon to spoon the hot wax into your mold (I also found some measuring cups that have a little spout on one side that work well for pouring the wax--again, I do not use these for any other cooking). I always fill my molds up to the top, as the wax settles just a tiny bit when cooling.


Once the wax has cooled and hardened, I trim my wicks so they are about 1/4" long. You are ready to wrap these up as a gift or use them around the house! These would be a great wedding or baby shower favor, and the materials can be bought in bulk online.


What are your favorite little gifts to make yourself?


Saturday, April 6, 2013

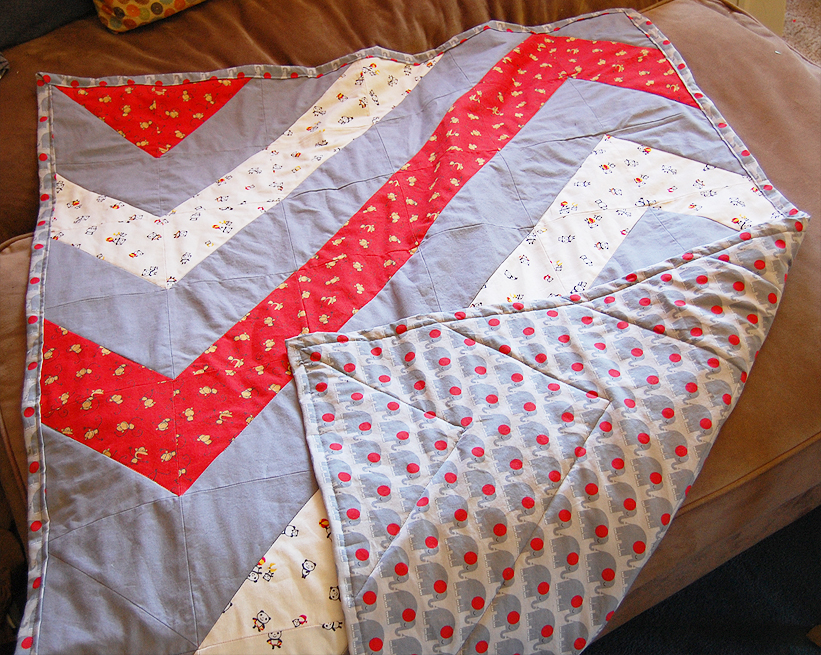
Mod Chevron Baby Quilt

Quilts are something that I don't usually attempt. They definitely take more time and effort than my average craft project, but the results generally garner many more "ooohs" "aaahs" and "wows" than something you can stitch together in an hour or two. As one of my super Besties from college announced she and her husband were expecting, I decided to go for the gusto and try this super cute quilt from Generation Q Magazine. Naturally I found the pattern on Pinterest, but modified it slightly to include fewer total fabrics. I ended up using 4 total fabrics:

1.5 yards of the grey/red elephant fabric for the backing
1.25 yards solid grey
3/4 yard off white with pandas
3/4 yard red with monkeys


If you are making one of these yourself you will also need a coordinating thread (or 2), batting, lots of pins, ruler and scissors or a rotary cutter and cutting mat. If you plan on trying out quilting, I highly recommend investing in a cutting mat and rotary cutter as well as several sizes of rulers, otherwise you up your chances of failure considerably.

I chose the colors based on Brook's registry (she chose lots of grey sheets, elephants and other zoo animals). So I wanted to find some zoo animal themed fabrics that tied in with the grey things she had picked out. This also shaped my decision to use fewer fabrics. I don't know if you've ever tried, but it is hard to find many coordinating fabrics for baby that use grey as the main colorway (also, I super loved the grey elephants with red ears and once you set your heart on that, the choices get even fewer).


This is the kind of project that I usually start and then half way through I get into something else and it never gets finished, but having the added motivation of making something really special for a great friend helped me to finish the whole thing in about 2 weeks! Unheard of for me considering I didn't take any vacation days from work to finish this up :)


This is only the 3rd quilt I have ever done start to finish, and I would highly recommend it for beginners. First, it is a baby quilt so the smaller scale keeps you from getting too overwhelmed. Mostly though, I think its a great, on trend pattern that isn't too complicated for pretty much anyone to follow.

Do any of you have a favorite quilt pattern you've seen or used lately? I'm thinking about tackling some quilts for my nieces/nephew for Christmas this year and I'd love to see some more ideas!


Sunday, May 27, 2012

Ombre Pom Pom Centerpiece


I was browsing Pinterest the other day (shocker, I know!) and came across a centerpiece similar to this one that was made with white carnations. Since I am helping my sister with the flowers for her wedding, and we are making them all from paper, I decided to try out a version with tissue paper pom pom flowers. I also wanted to get a little extra fancy, so I did an ombre arrangement starting with a white flower at the top and moving down into a dark blue at the base. This is a pretty easy arrangement to make, and would look great not only at a wedding, but a baby shower or birthday party!


The base for the arrangement is simply a candlestick (I snagged mine at the dollar store!) and a styrofoam ball (mine is 4" in diameter).

You will also need a bunch of tissue paper pom pom flowers, with a wire stem long enough to poke into your styrofoam ball. My finished centerpiece has a total of 25 flowers on it, made from pieces of tissue paper that were 4"x6". I left about 2" of stem on each (to make your stems sturdier you may want to double them over and wrap them with floral tape). Depending on the size of your styrofoam ball, the size of your flowers, and how densely you want to place them, you may need more or less.


I decided I didn't want to glue my styrofoam to the candlestick, so I could use it again later if I wanted to for another project. So to start, I placed my darkest color blue flowers around the candlestick base to hold it in place. I fluffed up my flowers and then moved o the next color. I also placed my single white flower at the top as a reference point so that my flowers wouldn't get too crooked as I built upwards.


Continue placing flowers and fluffing until you are satisfied with your finished product! If you don't want these as a centerpiece they would also be great as decoration on a dessert table, and if you want a taller base you could easily use a tall slender vase instead of the candlestick. :)