Showing posts with label baby projects. Show all posts

Saturday, April 6, 2013

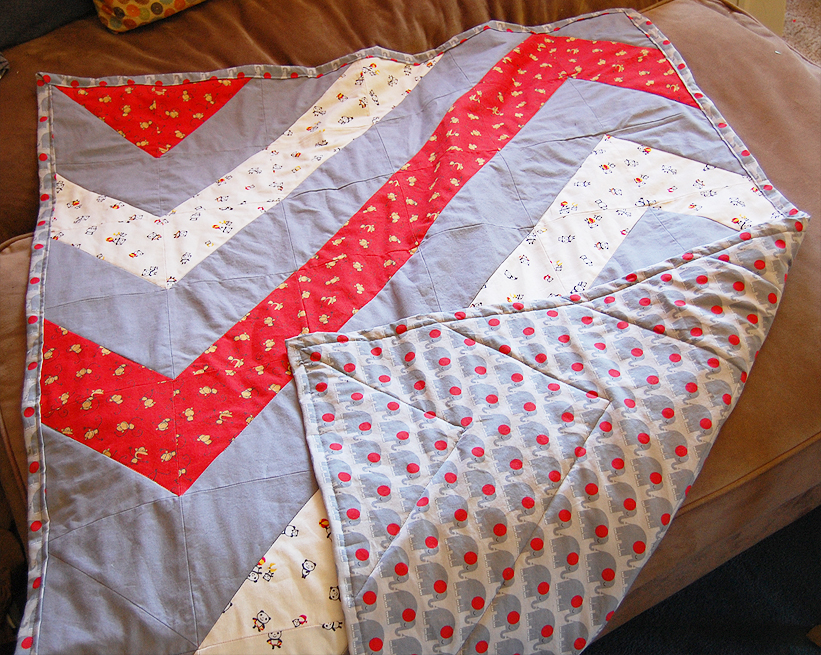
Mod Chevron Baby Quilt

Quilts are something that I don't usually attempt. They definitely take more time and effort than my average craft project, but the results generally garner many more "ooohs" "aaahs" and "wows" than something you can stitch together in an hour or two. As one of my super Besties from college announced she and her husband were expecting, I decided to go for the gusto and try this super cute quilt from Generation Q Magazine. Naturally I found the pattern on Pinterest, but modified it slightly to include fewer total fabrics. I ended up using 4 total fabrics:

1.5 yards of the grey/red elephant fabric for the backing
1.25 yards solid grey
3/4 yard off white with pandas
3/4 yard red with monkeys


If you are making one of these yourself you will also need a coordinating thread (or 2), batting, lots of pins, ruler and scissors or a rotary cutter and cutting mat. If you plan on trying out quilting, I highly recommend investing in a cutting mat and rotary cutter as well as several sizes of rulers, otherwise you up your chances of failure considerably.

I chose the colors based on Brook's registry (she chose lots of grey sheets, elephants and other zoo animals). So I wanted to find some zoo animal themed fabrics that tied in with the grey things she had picked out. This also shaped my decision to use fewer fabrics. I don't know if you've ever tried, but it is hard to find many coordinating fabrics for baby that use grey as the main colorway (also, I super loved the grey elephants with red ears and once you set your heart on that, the choices get even fewer).


This is the kind of project that I usually start and then half way through I get into something else and it never gets finished, but having the added motivation of making something really special for a great friend helped me to finish the whole thing in about 2 weeks! Unheard of for me considering I didn't take any vacation days from work to finish this up :)


This is only the 3rd quilt I have ever done start to finish, and I would highly recommend it for beginners. First, it is a baby quilt so the smaller scale keeps you from getting too overwhelmed. Mostly though, I think its a great, on trend pattern that isn't too complicated for pretty much anyone to follow.

Do any of you have a favorite quilt pattern you've seen or used lately? I'm thinking about tackling some quilts for my nieces/nephew for Christmas this year and I'd love to see some more ideas!


Wednesday, May 16, 2012

Rain Cloud Mobile


I just found out that not only is my cousin having a bouncing baby boy this Summer, but my brother and his wife will be having a boy as well! SO it seems it's raining men in our family right now! In honor of our new little men, I made this cute rain cloud mobile (you could make it far more pink for the little ladies)!

To make your own rain cloud mobile you will need:

Felt sheets in various colors
Scissors
String and/or Ribbon
batting or cotton balls to stuff the cloud
Embroidery floss and needle for finishing stitches
Rain Cloud Mobile template (at bottom of this post)
Any additional extras you want to add, go nuts!


Start by tracing your template onto your felt and cutting out all of your shapes. As this is a 3 dimensional project, I cut out 2 of each shape so they could be attached and all sides will look equally pretty, or handsome in this case :) You could easily make one side of your cloud white and the other gray or even black (it can even be an early teaching tool about the weather!).


You can cut out each rain drop once, or if you are like me, cut out a couple extras so you have more than 3 total drops. I decided to go with a mainly blue color scheme here and add in extra colors for some interest. I have to admit though, I think this would look great hanging by one of my windows and I might do an ombre rain drop scheme for that (probably orange)-- babies shouldn't have all the fun, right?


I used a no stitch heat and bond material on my raindrops so I could easily iron them together with a piece of string in between (the heat and bond was on one drop of each pair). I blanket stitched around each drop to add extra color, but it also hides a multitude of sins as far as how nicely each drop was cut out and matched up. If you do a lot of little felt projects, I highly recommend learning the blanket stitch. I found a great tutorial here.

My final assembled mobile looks like this:


It is now making it's way to Wisconsin to rain some love down on a cute little baby boy :)

The template for anyone wanting to make their own version of this:

Wednesday, January 4, 2012

Goodbye 2011, Hello 2012!


Hello everyone and welcome to 2012! If you are like me, 2011 kind of went by in a blur and left you in the dust (hence this post not coming until January 4th!). First of all I want to take a minute to thank each and every one of you for joining me here on The Craftinomicon, whether this is your first visit or just another one of many. I love writing these blogs, but without anyone to share them with I'm sure I'd eventually give it up. All of your comments, questions, emails, etc. are genuinely appreciated by yours truly.


The picture above shows several of my favorite projects and recipes from the past year. I can only hope I manage to outdo myself this year with even more great projects for you all to try out yourselves! The Holidays actually brought me and my family some very good news that will be the inspiration for some super awesome crafty projects this year.

First off, my cousin Lindsey and her husband announced on their Christmas card that they are expecting their first baby, due in late June! Everyone is quite excited and you can rest assured that there will be several baby themed projects making their way to the blog the first half of the year (and probably on through to the end!).


Second, and what I am probably most excited about, my little sister got engaged just a couple days after Christmas! Aaaah! Congratulations again, Katie and Isaiah! I am super duper excited! Being the crafty older sister, I am going to be providing ideas and likely several final projects for their special day! If you are planning a wedding or know someone who is, you will definitely want to keep coming back for some great tutorials on centerpieces, paper flower arrangements, folding several varieties of paper flowers, wedding accessories and more. We are frugal people, so these tips will be especially worth note to those of you who are being budget savvy this new year!


I also have a few crafty New Years resolutions that will be making their way onto the blog, as well as into my newsletter.

1) I am going to learn how to make soap this year. I have wanted to try it for awhile, but I am finally going to put forth the effort to research, buy the necessary supplies and then get to work experimenting on making my own soaps! If this is something you've always wanted to try too, get ready for a great journey into the world of soap making with me! If you have any resources that you would highly recommend, I would also appreciate them!

2) I am going to start including scrap projects monthly! My scrap projects ideas and scrap project roundup from this past year were really quite a hit, and the ideas don't stop there, so once a month (maybe more!) I am going to let you in on some great projects to use up scrap fabrics, papers and more!

3) For those amongst us trying to be a little healthier in 2012, I will be trying to limit my sinful dessert recipes on Friday Food Craft posts to only one or 2 a month. Other posts will likely have yummy dinner recipes, including a lot more veggies! I am also gong to be making some yummy breads and side dishes to liven up the everyday dinner fare.


Do you have any crafty resolutions? Are there any projects in 2012 you can't wait to start? I'd love to hear all about them!


Posts featured in above photo are:

Alice in Wonderland painted coaster
Humpback Whale Plush
Easy Bruschetta
Gift Card Envelopes
Make Your Own Bath Salts
Squid Drinking Glass
Hotdogtopus!
DIY gift bows