Showing posts with label paper flowers. Show all posts

Thursday, November 6, 2014

New Boutonniere Tutorial on Tuts+


Hey everyone! I forgot to mention that I have a new tutorial up on Tuts+! It is for this lovely Camelia boutonniere and includes the pattern for creating the paper flower. Head on over and check it out, let me know what you think.

Perfect for a winter wedding or formal, no?


Thursday, August 2, 2012

Easy Vellum Flower


I have been slaving away making flowers for my sister's wedding (it also helped pass the time while I was waiting for a replacement lens for my camera to arrive). As such, I was not really able to post in July, so I hope you all haven't been too mad at me. Fear not, the new lens has arrived and I am almost finished cutting out all of my sister's lovely wedding flowers.

While my sister decided on mainly paper roses, which can be found as part of my paper flower roundup post. I have come up with some cute and much easier flowers that can be used to fill in bouquets. A great thing about these flowers is that they work especially well with this great platinum vellum paper I found! Vellum doesn't like to be bent/shaped/hot glued the way copy weight papers do, so finding a simple flower with less fuss is a great way to use it. The shimmer of the paper also makes this simple flower look a bit more exciting. It's a win/win!


I started this flower by using the template from some of my tissue paper flowers, as shown above. I decided that cutting out 3 same sized petals, punching a small hole in the center, and arranging them around a simple bead on a wire looked simple and elegant, and was also pretty darn quick and easy! I used a tiny bit of glue between each petal to hold them in place. You could also cut out 3 petals of each size and make a larger, layered flower. I think a bouquet made entirely of these little beauties would be a great everyday centerpiece or table decoration!

I'll be posting again tomorrow to let you all in on my upcoming projects! If you can't stand the suspense, check out my July Newsletter! What have you all been up to during my unplanned break?

Tuesday, June 12, 2012

Paper Gerbera Daisies


My favorite flower is probably a gerbera daisy. I love the bright colors they come in, they seem to last quite a long time in a vase compared to other varieties, and something about them is just plain fun. I have been working on a pattern to make some out of paper for quite awhile, and came close to finishing it up for a Craft Wars challenge, but decided to hold off and work on it a tiny bit more to make sure it was just right. Here are my results, let me know what you think!

To make your own paper daisies you will need:

Paper of choice (I used a magazine)
Scissors
Daisy Petal Template
wire stem
glue
Decorative button
floral tape (optional)


I started by making a template for my petals. Since cutting these out gets rather time consuming (or maybe it's just the fact I always cut these out while doing something else like watching a movie?) I opted to go with only 3 different sizes of petals, cutting 2 of each size to make one flower. You could certainly play with the size on your computer/printer to get more like 5 or 6 different sizes of petal templates and use smaller petals in place of a button center, as I used.


I've never seen a flat daisy, so I used my scissors to gently curl each petal a little before gluing my edge tab under. As this daisy is made with magazine paper, not much pressure is needed, and you want to be careful not to tear your petals, as they did just take you awhile to cut out. I will mention, these work pretty great with vellum papers -- I'll get photos of the one I attempted and post it later on, but the fact that these only make a slight cone shape in the center once assembled makes them work well with thicker papers as well as thin.


I found these great flower shaped buttons and decided they'd look great with my flowers. You could use just about any button you like, or if you don't like the button look, attach your button to your floral wire stem, then cover it with a little batting and wrap it in your favorite fabric or some tissue paper.


Then start adding your petals on (you will need to poke a small hole in the center of each one before putting it on the wire), arrange them as you like (you may need to add a little glue between each layer of petals to help them stay in place) and wrap the stem in floral tape if you want. I always wrap mine with tape as I think it look nicer, but it is not necessary.

If you want to check out more handmade crafts and recipes, visit this link party at Frugal By Choice, Cheap By Necessity.

Sunday, May 27, 2012

Ombre Pom Pom Centerpiece


I was browsing Pinterest the other day (shocker, I know!) and came across a centerpiece similar to this one that was made with white carnations. Since I am helping my sister with the flowers for her wedding, and we are making them all from paper, I decided to try out a version with tissue paper pom pom flowers. I also wanted to get a little extra fancy, so I did an ombre arrangement starting with a white flower at the top and moving down into a dark blue at the base. This is a pretty easy arrangement to make, and would look great not only at a wedding, but a baby shower or birthday party!


The base for the arrangement is simply a candlestick (I snagged mine at the dollar store!) and a styrofoam ball (mine is 4" in diameter).

You will also need a bunch of tissue paper pom pom flowers, with a wire stem long enough to poke into your styrofoam ball. My finished centerpiece has a total of 25 flowers on it, made from pieces of tissue paper that were 4"x6". I left about 2" of stem on each (to make your stems sturdier you may want to double them over and wrap them with floral tape). Depending on the size of your styrofoam ball, the size of your flowers, and how densely you want to place them, you may need more or less.


I decided I didn't want to glue my styrofoam to the candlestick, so I could use it again later if I wanted to for another project. So to start, I placed my darkest color blue flowers around the candlestick base to hold it in place. I fluffed up my flowers and then moved o the next color. I also placed my single white flower at the top as a reference point so that my flowers wouldn't get too crooked as I built upwards.


Continue placing flowers and fluffing until you are satisfied with your finished product! If you don't want these as a centerpiece they would also be great as decoration on a dessert table, and if you want a taller base you could easily use a tall slender vase instead of the candlestick. :)

Wednesday, January 25, 2012

Paper Flower Roundup


As promised, here is a roundup from around the web of some gorgeous paper flowers! All of these would be great for weddings, home decor or a gift for your special someone this Valentine's Day!

Above you will see a rose that I made thanks to a great tutorial and template from Ellinee. I tried several roses, I will post more photos of mine at the bottom of this post, and I can say that regular copy paper (or paper of a similar weight) is easiest for these, though you can also make them with card stock and vellum without too much trouble. I really love these as I have seen several tutorials for roses around the web that are either too simple and so don't look very realistic or need you to cut out every single petal individually (and who has the time to do all that?).

The rose template even comes in several colors so you could print it out onto white copy paper and get a variety of colors! I chose to print out a template onto card stock and trace it onto some fancier paper I had lying around. I also left out the leaves and glued mine into stems so I could make a bouquet. To add a stem, just poke a little hole in the center of your petals and string them on, in the correct order, before gluing them in place.


Of course, no paper flower roundup is going to be complete without mention of my own tutorials! If you happened to miss them, I made a couple of cute tissue paper flower tutorials: Tissue paper pom pom flowers and tissue paper flowers with individual petals.


My favorite of my own tutorials was, of course, my paper calla lilies.


If crepe paper is more your style, there are a multitude of varieties available with tutorials from Martha Stewart Weddings. These even have tutorials for making several varieties of faux stamens to build your flowers around!


Are you into quilling? Then these double fringed flowers from Inna's Creations might be right up your alley. I haven't tried these out myself yet, but when I do I will be sure to let you all know how they turned out :)


Have some leftover party streamers? Check out these cute centerpieces. It's an easy version of a poppy and the crepe paper streamers used are readily available (I know I've seen some in my local dollar store!).


Have you seen any paper flower tutorials that shouldn't be missed? Let me know, I'd love to check them out!


Here are some more of my paper roses. Which is your favorite?


Monday, January 16, 2012

Paper Calla Lilies


Hey everyone! I'm super excited about this tutorial, as I have been toying with these flowers for over a week now trying to get them just right. I was actually unable to find any other tutorials online for making paper calla lilies, though I did see several lovely varieties on image searches. Hopefully I managed to do these beautiful flowers some justice :)

To start out you will need:

Paper in the color of your choosing (I used Lokta Fiber paper from Paper Source)
floral wire
scissors
pencil (for lightly tracing template onto your paper)
lily template (I suggest printing it out onto card stock for easier tracing)
Sculpey clay in a color of your choosing (or some other stamen, if you come up with a better idea please share it!)
floral tape
glue


You will want to print out the following template in your desired size. The great thing about making paper flowers is you can make flowers any size you want, large or small no matter what size they come in naturally.


Once I have decided on the size of flowers I am making, I start my whole flower making process on these by first making a bunch of stamens for my lilies. To do this I twist a length of floral wire to give myself a small stem, then I use Sculpey clay (available in most art and craft stores) to shape my stamens around one end of my wire. Calla lilies have really easy stamens, as they are just a long cylinder you roll out on a flat surface once you have inserted your wire. I generally make a short, fat cylinder, then insert my wire, then roll to desired length. From one package of Sculpey clay I can get about 8 stamens that are about 4 inches long and 1/4- 1/2" wide. Follow the baking instructions on your clay package to bake and set your clay.


Once you have your stamens made, it is time for the flower petals. Trace your template onto the paper of your choice. A thinner paper works quite nicely for these, as there is a lot of bending and these look a bit better without hard folds and creases. A crepe paper would work nicely, if you can find it in sheets as opposed to streamers. Cut out your petal, being careful to try and cut slightly inside your lines to avoid any pencil on your final flower.


Now, you will get to start shaping your petals. I use my fingers to start gently bending the paper into my desired shape, like so:


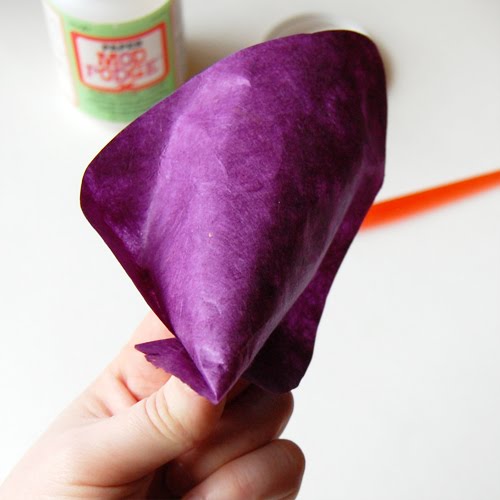
If you have a stiffer paper, you might want to use the back of a spoon and rub it over the surface of your paper to soften it a bit. I have a burnishing tool from a college printmaking class that I use for this, but you can also just rub with your fingers to make your paper fiber soften up and become a bit more mobile. Once you get your basic shape, you will want to shape the bottom of your flower into a cone and glue it in place.


I tend to make a perfect point at one end, as shown above. The insert the stamen, I will snip just a tiny bit off to make a hole that the wire can pass through.
Once your glue dries, you end up with this shape, a petal ready for some final shaping and a stamen:


To shape my petal, I again use my fingers to gently bend and fold the petal to my desired final shape:


Now, I insert the stamen, glue it into place and wrap my floral wire with floral tape. You can also add a longer stem and some leaves if you want to :)


I'd love to hear what you all think of how these turned out, I'm really excited about them!