Showing posts with label Valentine. Show all posts

Monday, February 3, 2014

Valentine's Day Sampler on Tuts+


I'm working on a bunch of projects for National Letter Writing month, but in the meantime you may want to check out the Valentine's Day Sampler I created for Tuts+. It is super easy, so even a beginner can whip it up in no time. The pattern and some helpful tips are all included in the tutorial.

Look for some more tutorials from me up on their site in the coming months, as well as new additions to the stitch library here on The Craftinomicon.


Wednesday, February 1, 2012

Embroidery How To: Couching


Today is my final embroidery tutorial, and as previously mentioned it is on couching. Couching is basically using one thread the sew another thread into place, so to do it you will need two lengths of thread.

I start, as usual, by drawing my pattern onto my fabric. Since Valentine's Day is coming up, and I haven't really done any Valentine's projects yet (How is it February already?) I decided to go with this little heart.


Next, you will need a length of thread long enough to go all the way around your pattern. Thread your needle, tie a knot in the end and pull it through wherever you would like to start your pattern. I'm starting at the bottom of my heart.


Then, thread your second needle, knot the end and pull it through slightly ahead of where you started your first. This thread is going to be used to sew your first thread into place along your pattern lines. I try to space my stitches with this second thread as evenly as possible. To go around curves, you may need to make your stitches a bit more closely together to keep a smooth curve.


Simply pull your needle up through your fabric, then sew it back through with your first thread ending up wrapped neatly by your second.


Continue on, spacing your stitches as evenly as possible. If you come to a space in your pattern that has a sharp angle, like the top of my heart, make sure that you place a holding stitch on that point. Couching makes it very easy to do embroidery in a single line that can make very tight turns because of the anchoring stitches that hold your actual line in place.


Once finished, you will sew your original thread back to the back of your fabric at your ending point, and tie it off. I generally tie the ends of my first and second threads together into a knot on the back. Voila! Your finished heart!


For those who are curious, the back of your project will look a bit like this:


I hope you enjoyed my mini series on embroidery! This month will be filled with lots of new projects like more paper flowers, some cute crafts for babies, a couple more Valentine's and much more!

Wednesday, January 25, 2012

Paper Flower Roundup


As promised, here is a roundup from around the web of some gorgeous paper flowers! All of these would be great for weddings, home decor or a gift for your special someone this Valentine's Day!

Above you will see a rose that I made thanks to a great tutorial and template from Ellinee. I tried several roses, I will post more photos of mine at the bottom of this post, and I can say that regular copy paper (or paper of a similar weight) is easiest for these, though you can also make them with card stock and vellum without too much trouble. I really love these as I have seen several tutorials for roses around the web that are either too simple and so don't look very realistic or need you to cut out every single petal individually (and who has the time to do all that?).

The rose template even comes in several colors so you could print it out onto white copy paper and get a variety of colors! I chose to print out a template onto card stock and trace it onto some fancier paper I had lying around. I also left out the leaves and glued mine into stems so I could make a bouquet. To add a stem, just poke a little hole in the center of your petals and string them on, in the correct order, before gluing them in place.


Of course, no paper flower roundup is going to be complete without mention of my own tutorials! If you happened to miss them, I made a couple of cute tissue paper flower tutorials: Tissue paper pom pom flowers and tissue paper flowers with individual petals.


My favorite of my own tutorials was, of course, my paper calla lilies.


If crepe paper is more your style, there are a multitude of varieties available with tutorials from Martha Stewart Weddings. These even have tutorials for making several varieties of faux stamens to build your flowers around!


Are you into quilling? Then these double fringed flowers from Inna's Creations might be right up your alley. I haven't tried these out myself yet, but when I do I will be sure to let you all know how they turned out :)


Have some leftover party streamers? Check out these cute centerpieces. It's an easy version of a poppy and the crepe paper streamers used are readily available (I know I've seen some in my local dollar store!).


Have you seen any paper flower tutorials that shouldn't be missed? Let me know, I'd love to check them out!


Here are some more of my paper roses. Which is your favorite?


Monday, January 16, 2012

Paper Calla Lilies


Hey everyone! I'm super excited about this tutorial, as I have been toying with these flowers for over a week now trying to get them just right. I was actually unable to find any other tutorials online for making paper calla lilies, though I did see several lovely varieties on image searches. Hopefully I managed to do these beautiful flowers some justice :)

To start out you will need:

Paper in the color of your choosing (I used Lokta Fiber paper from Paper Source)
floral wire
scissors
pencil (for lightly tracing template onto your paper)
lily template (I suggest printing it out onto card stock for easier tracing)
Sculpey clay in a color of your choosing (or some other stamen, if you come up with a better idea please share it!)
floral tape
glue


You will want to print out the following template in your desired size. The great thing about making paper flowers is you can make flowers any size you want, large or small no matter what size they come in naturally.


Once I have decided on the size of flowers I am making, I start my whole flower making process on these by first making a bunch of stamens for my lilies. To do this I twist a length of floral wire to give myself a small stem, then I use Sculpey clay (available in most art and craft stores) to shape my stamens around one end of my wire. Calla lilies have really easy stamens, as they are just a long cylinder you roll out on a flat surface once you have inserted your wire. I generally make a short, fat cylinder, then insert my wire, then roll to desired length. From one package of Sculpey clay I can get about 8 stamens that are about 4 inches long and 1/4- 1/2" wide. Follow the baking instructions on your clay package to bake and set your clay.


Once you have your stamens made, it is time for the flower petals. Trace your template onto the paper of your choice. A thinner paper works quite nicely for these, as there is a lot of bending and these look a bit better without hard folds and creases. A crepe paper would work nicely, if you can find it in sheets as opposed to streamers. Cut out your petal, being careful to try and cut slightly inside your lines to avoid any pencil on your final flower.


Now, you will get to start shaping your petals. I use my fingers to start gently bending the paper into my desired shape, like so:


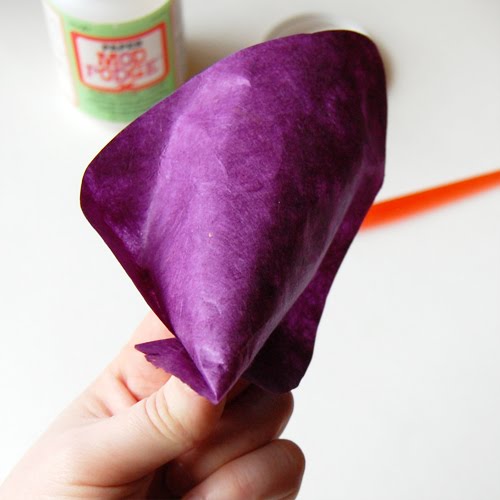
If you have a stiffer paper, you might want to use the back of a spoon and rub it over the surface of your paper to soften it a bit. I have a burnishing tool from a college printmaking class that I use for this, but you can also just rub with your fingers to make your paper fiber soften up and become a bit more mobile. Once you get your basic shape, you will want to shape the bottom of your flower into a cone and glue it in place.


I tend to make a perfect point at one end, as shown above. The insert the stamen, I will snip just a tiny bit off to make a hole that the wire can pass through.
Once your glue dries, you end up with this shape, a petal ready for some final shaping and a stamen:


To shape my petal, I again use my fingers to gently bend and fold the petal to my desired final shape:


Now, I insert the stamen, glue it into place and wrap my floral wire with floral tape. You can also add a longer stem and some leaves if you want to :)


I'd love to hear what you all think of how these turned out, I'm really excited about them!


Saturday, February 5, 2011

Zombie Valentine's

Well, here it is, the requisite February Valentine post. Rather than do it up all hearts, lace and sentiment, I chose zombies!

The back is some patterned card stock, the zombie is done in felt with machine sewn details. If you want to try your own mixed media card with sewing, I definitely recommend a thicker card stock, especially if you will be sewing to fill in some larger areas, as I did with the mouth, shoes, etc. Thinner paper will be more likely to tear, but will work as long as you are careful.