Showing posts with label embroidery. Show all posts

Monday, August 10, 2015

Transferring Embroidery patterns


Long time no see! Life has been crazy, and for those of you that don't follow me on facebook, you might have missed my Tuts+ post on methods of embroidery pattern transfer. Head on over and check it out, I'm going to try to get back to blogging again soon. Owning a house really takes up the free time :)

What projects have you all been up to lately??


Tuesday, August 19, 2014

Jazz Up Your Embroidery


If you've taken a peek at my Embroidery Stitch Library you may be ready to take your stitching to the next level. I have a post on different types of thread up today at Tuts+, go check it out and start experimenting!

The new house is still shaping up slowly, and I hope to have a "before" tour ready to share with you all sometime soon. There are a LOT of projects on the horizon, so thank you all for bearing with me in this hectic post-move time. I can't wait to share projects as well as some tips and tricks I've been picking up!


Friday, March 28, 2014

Origami Animal Embroidery Patterns


I don't know what it is, but I've been really into "origami" style embroidery patterns lately. Confession: I was WAY too good at geometry when I was in school. I think I got 106% in that class (yeah, I did extra credit when I already had 100%--NERD). I sketched up some patterns from origami animal photos (you can find about any animal you want when searching images online--just sketch the fold lines to make it 2 dimensional). I modified them slightly, mostly leaving out any very tiny "fold" lines that I felt would detract from a final embroidered project.


I really liked this squirrel, so I made it into a wall hanging by gluing the embroidered fabric to the hoop once I was finished stitching and covering the back with a piece of trimmed card stock so you can't see the stitches from the back anymore. To cover the back, just trace around the embroidery hoop onto card stock and cut out the circle just inside the traced lines. I tied a piece of ribbon at the top and voila! Now I can hang it on my wall and smile at his geometric squirreliness.

Feel free to snag the .jpg of the squirrel pattern here and resize it to your needs, or you can download the .pdf of all 4 patterns I made here (it's free).


If embroidery isn't quite your style, I found these necklaces on Etsy! I got the squirrel (of course!).


Friday, March 21, 2014

How to Embellish Fabrics with Embroidery


I have quite a bit of fabric in my stash, I just can't pass up a good deal. Sometimes I just don't feel inspired by the fabrics I have when it's time to make a project. I have found that I can jazz up the stuff I have (or have had for a loooooong time) by adding some embroidery to the patterns.


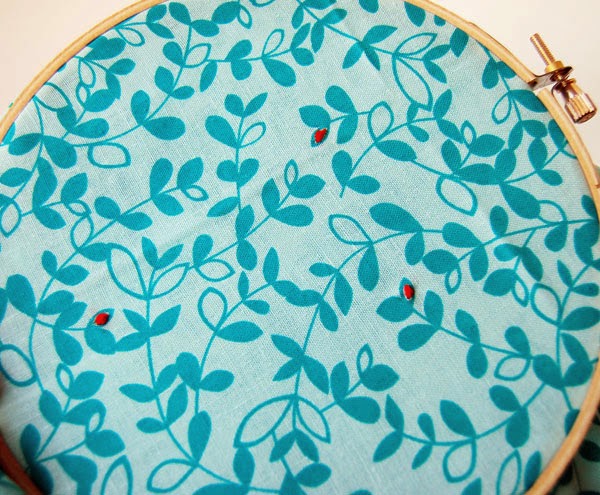
I like patterns like this one with small leaves, because it is easy to add in some extra interest with a new color, by using satin stitch to fill in small areas. This is also a great way to create color combos you love without looking tirelessly for fabrics containing both colors. Love the gray and yellow color combo? Find fabrics done with only gray tones and stitch in some yellow!


This method is also great because you can decide how much of your stitched color you want to add. I like just adding a little red here and there with this teal fabric, but you could go nuts and fill in all of the outlined leaves if you want to.


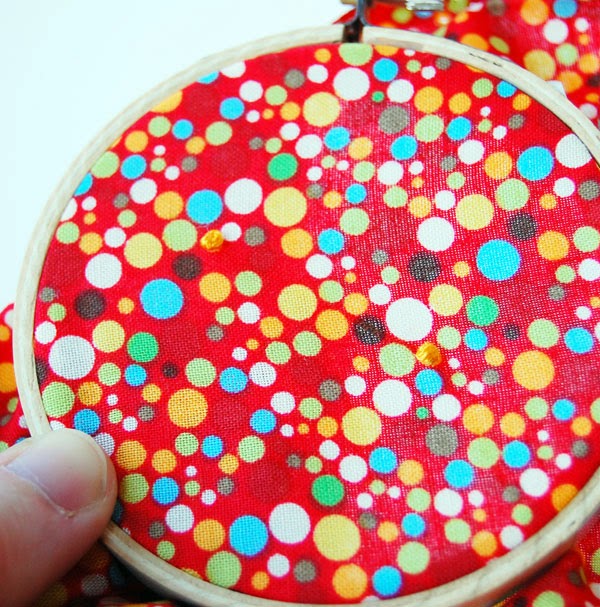
I also love adding texture to fabrics with embroidery. This red fabric with multi-colored polka dots is already super busy, so I found a floss color that matches the yellow and added in some french knots to give it more dimension.


You can make french knots in a couple different sizes to add more texture, and since this fabric has so many colors you can do a few dots of each color if you want, or just pick out a few dots of the same color (like I did with the yellow). This is also a great little project you can take with you just about anywhere (and it's fun to use some fabrics from your stash without actually USING the fabrics from your stash). It might even inspire you to make some small projects with your cute new embellished fabrics!

Do you have any ways you like to freshen up your fabrics? I'd love to hear about them in the comments :)


Tuesday, March 4, 2014

Embroidery Tutorials on Tuts+


Hey everyone! I know my posts here have been few and far between so far this year, and I just thought I'd take a minute to say hello and let you know what I have been up to. I am currently reworking a lot of my embroidery tutorials for the Crafts & DIY section of Tuts+. In addition, I have lots of projects and patterns in progress, that will be added to The Craftinomicon starting mid March through the rest of the year!


I am going to be steadily increasing the posts here on the blog, but if you are looking for daily doses of crafty inspiration feel free to follow me on Pinterest or instagram (where you will get a lot of in progress and sneak peek looks at what is going on here in Casa de Craftinomicon).


Monday, February 3, 2014

Valentine's Day Sampler on Tuts+


I'm working on a bunch of projects for National Letter Writing month, but in the meantime you may want to check out the Valentine's Day Sampler I created for Tuts+. It is super easy, so even a beginner can whip it up in no time. The pattern and some helpful tips are all included in the tutorial.

Look for some more tutorials from me up on their site in the coming months, as well as new additions to the stitch library here on The Craftinomicon.


Sunday, November 3, 2013

Embroidered Sugar Skulls


Happy (belated) Dia de Los Muertos! I made this sugar skull embroidery pattern for the holiday and just had to share it! You can find out how to make some of your own great sugar skull embroidery patterns here.

To stitch your own sugar skull you will need:

Fabric of your choosing
A variety of embroidery flosses (I prefer bright colors for these)
needle
scissors
embroidery hoop
transfer pen


You can use the above pattern that I created, or make one of your own using the templates on my Sugar Skull Embroidery Pattern post. Once you are satisfied with your pattern, use an embroidery transfer pen to trace it onto your fabric. Then stitch away in the colors of your choosing.


I found these neat glow in the dark threads online and ordered some to weave in with my embroidery floss. I'll be honest, the pink didn't work at glowing nearly as well as the green or white, so in the future I'd probably leave it out, but it was fun to try something new!. This would also be a great project to experiment with adding small beads (you could even get small strands of beads and use the couching technique to stitch your patterns with them!).


Happy November!