Showing posts with label diy. Show all posts

Thursday, November 6, 2014

New Boutonniere Tutorial on Tuts+


Hey everyone! I forgot to mention that I have a new tutorial up on Tuts+! It is for this lovely Camelia boutonniere and includes the pattern for creating the paper flower. Head on over and check it out, let me know what you think.

Perfect for a winter wedding or formal, no?


Tuesday, November 4, 2014

Bathroom Remodel


I feel like I haven't blogged in forever! The new house is coming along (it feels like a very slow process, but many people have told the hus and I that they are shocked by how much we have done already since buying our home in July).

If you follow me on Instagram you have likely already seen much of the progress we have made, but I thought I'd share some peeks of our bathroom (still in progress).

Here is the bathroom floor before we tore it up and laid down new hex tiles. Gorgeous, right?


Here is the floor about half done. Alreadya huge improvement.


Here is the progress from this past weekend. We took out the grimy old fiberglass tub surround and laid new ceramic subway tiles (tiling was definitely easier the second time around, but I don't know how anyone can do this as a job--my most heartfelt respect to anyone in this line of work).

This weekend we hope to paint the bathroom, caulk everything and install the new baseboards. Then I'll have a nice new bathroom, and I can't wait to take some nice final photos to show you all!

Are any of you working on home improvement projects? I'd love to hear what you are working on and if you have any tips or insights!


Thursday, May 8, 2014

Last Minute DIY Ideas for Mom


Hey all! With Mother's Day fast approaching, I know some of you may be at a loss of what to get or make for mom (or maybe you need some ideas of what the kids can make for mom/grandma, etc). Here is a list of some super easy last minute gifts to bring a smile to any mom's face. Happy Mother's Day!


Make mom a long lasting bouquet of paper flowers. There are so many varieties to choose from, and you can use any colored or patterned paper you like! Tailor make some polka dotted daisies or striped roses in mom's favorite colors :)


Make a cute geometric heart card or framed wall art with this tutorial from Ludorn (In German and English).


Make some gem shaped shrink plastic earrings (or charm bracelet, or necklace) with this awesome tutorial from Minted Strawberry.


Whether mom has a green thumb or not, these succulents in painted ball jars will be a great fit! The gals at Lolly Jane even have printable gift tags for you to use!


Have a lot of mom's in your life? You can whip up a huge batch of these bath salts and put them in cute containers to gift to everyone! Bonus points if you scrub the bathroom for mom before gifting these to her!

Happy Mother's Day!


Monday, April 7, 2014

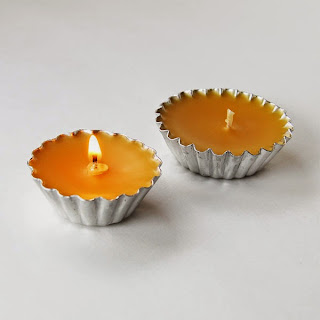
DIY Beeswax Tart Candles


I've been working on some craft ideas that would make cute little gifts lately (you know, wedding season is fast approaching). These cute little candles fit the bill! I used mini tart pans from the kitchen goods store in my neighborhood (about 50-60 cents a piece) as the containers for my candles. The wicks, wax and honey almond scent are from Bulk Apothecary, they aren't paying me for saying that- I just really like ordering my candle making/lotion making supplies from them, they have all kinds of awesome stuff.

To make these candles at home you will need:


Beeswax (If you can find it in the tiny pellets, I recommend it. Grating whole blocks of wax is tedious)
candle wicks
containers (I used mini tart shells)
Fragrance oil (optional) Beeswax does have a subtle scent on its own, and you certainly don't need to scent your candles if you prefer them to be more plain
Glass bowl* (to create a double boiler)
stirring utensil* (I use a plastic spoon)

*I always recommend that you use a bowl and spoon for making candles/beauty products that you do not eat with. I got a pack of plastic spoons as well as a glass bowl at the dollar store. I always hand wash these items and keep them separate from the dishes we eat with.


To start, I measure out my wax pellets. I wanted my tart shells to be pretty much full, so I filled each tarts hell I was using so it was heaping with pellets and dumped them into my glass bowl. I then added a couple extra Tablespoons of pellets just in case any got spilled when filling my candles.

I had ordered a large quantity of 3" long wicks, so I trimmed them a bit before placing them in the tart pans (to about 1.5"). Once the candles are done, you can trim the wicks further if needed.

Place your glass bowl of wax over a pot of simmering water. This will slowly melt the wax. You will want to stir the wax until it is all melted and then add any fragrance if you wish to do so. I added about 12 drops of fragrance for my 3 small tart candles, but if you like a stronger fragrance you can add more.

Once the wax is melted and the fragrance has been stirred in, you can start to fill your candles. I always place the objects I am filling on top of some freezer paper and/or an old towel in case I spill any wax while pouring. Cleaning wax off a table or counter top is a huge hassle. If your candle mold is small, like mine, you may want to use a spoon to spoon the hot wax into your mold (I also found some measuring cups that have a little spout on one side that work well for pouring the wax--again, I do not use these for any other cooking). I always fill my molds up to the top, as the wax settles just a tiny bit when cooling.


Once the wax has cooled and hardened, I trim my wicks so they are about 1/4" long. You are ready to wrap these up as a gift or use them around the house! These would be a great wedding or baby shower favor, and the materials can be bought in bulk online.


What are your favorite little gifts to make yourself?


Tuesday, March 25, 2014

7 Great Crafts for Spring


Spring is finally here (even though it doesn't quite feel like it everywhere). Get yourself in the spirit either way by making some of these cute Spring crafts. :)


Make some paper flowers. No matter what flower is your fave, you can find a paper variety to whip up on a weekend.


If gardening is your thing, these fabric covered flower pots are sure to brighten up your space. I love them as part of my tiny windowsill garden.


I saw these adorable bees over on The Experimental Home. Use your leftover plastic Easter eggs to whip up a hive full of them :)


These dinosaur garden markers were one of my favorite garden projects ever. They add whimsy and color to your garden while you are waiting for everything to sprout!


April showers bring May flowers, so you might as well join in the fun with a rain cloud brooch. If storms are more your style change it up with a cloud + lightning brooch instead.


Don't forget to brighten up your office with some candy colored binder clips. Some clips, glue and scraps of paper or fabric are all you need!

Take a few minutes and make some bright Spring stationery! These cards are super easy and will brighten anyone's day when they open the mail.

What are your favorite Spring crafts?


Friday, March 21, 2014

How to Embellish Fabrics with Embroidery


I have quite a bit of fabric in my stash, I just can't pass up a good deal. Sometimes I just don't feel inspired by the fabrics I have when it's time to make a project. I have found that I can jazz up the stuff I have (or have had for a loooooong time) by adding some embroidery to the patterns.


I like patterns like this one with small leaves, because it is easy to add in some extra interest with a new color, by using satin stitch to fill in small areas. This is also a great way to create color combos you love without looking tirelessly for fabrics containing both colors. Love the gray and yellow color combo? Find fabrics done with only gray tones and stitch in some yellow!


This method is also great because you can decide how much of your stitched color you want to add. I like just adding a little red here and there with this teal fabric, but you could go nuts and fill in all of the outlined leaves if you want to.


I also love adding texture to fabrics with embroidery. This red fabric with multi-colored polka dots is already super busy, so I found a floss color that matches the yellow and added in some french knots to give it more dimension.


You can make french knots in a couple different sizes to add more texture, and since this fabric has so many colors you can do a few dots of each color if you want, or just pick out a few dots of the same color (like I did with the yellow). This is also a great little project you can take with you just about anywhere (and it's fun to use some fabrics from your stash without actually USING the fabrics from your stash). It might even inspire you to make some small projects with your cute new embellished fabrics!

Do you have any ways you like to freshen up your fabrics? I'd love to hear about them in the comments :)