Showing posts with label paper craft. Show all posts

Thursday, November 6, 2014

New Boutonniere Tutorial on Tuts+


Hey everyone! I forgot to mention that I have a new tutorial up on Tuts+! It is for this lovely Camelia boutonniere and includes the pattern for creating the paper flower. Head on over and check it out, let me know what you think.

Perfect for a winter wedding or formal, no?


Sunday, February 23, 2014

Make Your Own Constellation Notecards: 3 Ways


I love fancy notecards. I'm always drawn to fancy card and paper stores, but the costs can really add up on fancy cards with all the glitz and glamour. These constellation notecards are super easy to whip up, and don't take tons of materials (I even got some of my items on sale!).


To make your own constellation notecards you will need:

Black or midnight blue cardstock (I used 8.5"x11" sheets)
scissors or small paper cutter
ruler (unless you have a paper cutter with built in ruler)
small self adhesive gemstones
silver metallic pen or marker (I used a Sharpie silver metallic permanent marker)
pencil
needle
print outs of your favorite constellations (I did am image search on Google to find mine)

I started out by cutting my black cardstock sheets into cards. You can easily make 2 cards out of each sheet, and cut individual cards to different shapes if you like. A good standard size is 4 1/4" x5 1/2 inches for the final card (which can be done by cutting your original sheet of paper in half and then folding to make your card).


Next, use a needle to poke small holes in your constellation design where the stars are located, as show above. I then positioned my deisgn on my card and used a very sharp pencil to lightly mark out where my stars are. :)


For my first card, I stuck small self adhesive gems where all of the stars are located. I like the look of this one a lot, but if you are giving these away to someone that isn't very familiar with constellations, you might want to try the outline method.


For this card, I still made the pencil dots to mark where my stars go. Instead of placing my sticker gems, I connected the dots with a metallic silver marker. I let each segment sit a minute or two to make sure I didn't smear my marker lines. This shows the outline of the entire constellation and makes it more recognizable.


My favorite option is the third card, which combines the outline with the gemstones. I did my outlining first, then stuck a gemstone where each star is located. Quick and easy and something I am sure would brighten someone's day.

Have you sent anyone something special yet during National Letter Writing Month?


Wednesday, January 1, 2014

New Year Goals Tin


Happy New Year everyone! It is that time of the year: when you set those goals to last until 2015 rolls around. If you are like a lot of people, you might set some lofty goal and then fail to reach it each year, but I'm here to give you a crafty little way to make the best of it this year. A cute little tin filled with monthly goals to help you achieve the bigger "resolution".

To make your own goal tin for 2014 you will need:

Colored papers or card stock of your choice
scissors or a small paper cutter
pen or pencil
washi tape
small jar or decorative tin


Start by cutting out your paper strips. I used 12"x12" sheets of cardstock and cut them into 6"x1" strips. I used a different color of paper for each goal area: 1 for blogging goals, one for exercising goals, and one for food goals. You can make as many "mini goals" for each category as you like, but don't overwhelm yourself with more than 12 in any category--you want to be able to achieve them all by December!


Next, write a mini goal for the month onto each paper slip. I really want to try to blog more this year (I find I often don't realize how long it has been between posts because of all the updates I post on facebook or instagram- I want to be more present on my blog this year).

Try to set yourself up for success by not making your goals too specific (instead of "lose 2 pounds each week" make goals like "take a 30 minute walk after dinner 4 times a week"). By setting small goals that can become habits, you set yourself up to succeed in your larger goal!


Close each mini goal with a colorful piece of washi tape. This will help keep you from "cherry picking" your goals each month by keeping those paper slips closed (no peeking!). I also find that by having a bunch of colorful paper slips in your jar, with happy little tape accents you are more likely to notice those goals at the start of each month--and maybe even look forward to each new challenge!

Put all of your paper slips into a jar, and place that jar somewhere you will notice it. You can even set up a reminder at the start of each month so you don't forget to start those new mini goals (if you use Outlook or another program with calendar capabilities it is easy to set reminders up--you can even do them on your smart phone!).


As you can see, I chose a decorative tin for my goals, as it is what I had on hand. I have seen lots of different glass jars, etc. at places like the dollar store though, so get creative on what method best motivates you to keep your mini goals going all year long!


Sunday, September 8, 2013

Fish Scale Patterned Paper Placemat


This is an easy project that is extra eco-friendly. I used a 2" hole punch to punch out circles from an old magazine and then pasted them onto an extra sheet of 12"x12" card stock. Even the glue was eco-friendly! I used Glu6 craft paste from Nine Lives Products, it is a new craft glue that is made from recycled styrofoam, how cool is that!? They make a few different glue products, all from styrofoam, you should definitely give them a try. The glue even smells kind of good, it reminded me of Gojo orange pumice hand cleaner, which all of my art classes used to have for us to use (elementary school and up). Totally nostalgic.


Start by punching out lots of circles from a magazine. I used an old fashion magazine, which had lots of super colorful ads and whatnot for great variety of small images, but any magazine should do the trick. You could also add in some newspaper images as well, but the ink on newspaper tends to smudge a bit.


I started at the bottom of my sheet of card stock and worked my way up to create this fish scale pattern. Your very bottom layer will use half circles. You could use a smaller or larger hole punch if you want, just make sure the size will fit evenly on your paper (since my paper is 12" wide, anything that divides evenly into 12 would work without needing to trim the paper).


Above you will see the finished starting row of my scales. To start the second row, choose a side to work from and you will again start with a half circle, as the fish scale pattern is staggered by an inch. The circles that are not on the ends will be full circles.


Continue your pattern up the sheet of card stock, as shown above. I tried to evenly disperse circles with lots of detail with circles that had solid color so that no one area was extra busy while one area was too plain, but overall it's a pretty colorful piece of work. Once your glue is dry you can coat this with a top coat or clear sealant. If using this for a place mat isn't your style, it would also make a great piece of wall art, or could be cut up into coasters. I'm thinking about lining the drawers in my craft desk with something like this!


Glu6 craft paste sample provided by Nine Lives Products, manufactured in the USA (CA). All opinions are my own.


All Craftinomicon readers can get 25% off their Glu6 order at Nine Lives Products by using coupon code Fall2013 at checkout until October 31st!

Wednesday, April 18, 2012

Butterfly Wall Art

I'm breathing a huge sigh of relief as I am finally unpacked, with internet connected and my craft supplies all ready to go! I had some requests for Spring and Summer DIY art projects, so I thought I'd start out with something pretty easy and highly customizable!

To make a paper butterfly collage of your own you need a few supplies:

Decorative paper
Scissors or Xacto blade
Butterfly images to trace and cut out (I have provided some at the bottom of this post which can be made to any size you like, but feel free to make some of your own or image search around the internet)
Pins for mounting butterflies to the wall, or a canvas to mount butterflies to before wall mounting.

You can use any paper you like, but for butterflies you want to stand alone and mount to your wall individually, I would recommend card stock as other papers do not hold their shape as well (wings may get a little droopy, especially on larger sized cut outs). All you need to do is trace your butterfly image onto your paper, cut it out and position any way you like. For something you want to be able to move (or if you aren't allowed to make a bunch of holes in your wall in a rental) You can get a canvas to secure your butterflies to, or a magnet board (then attach magnets to your butterflies).

I also recommend thinking outside the box a little with your paper. I have some wonderful photo realistic scrap booking paper, and I think my favorite butterfly is the one with an image of a sparkler on it. Never would you find this in nature, but it sure reminds me of 4th of July cookouts and all of the other Summer activities that I just can't wait for :)


Using a more decorative paper also makes your butterflies much more interesting without having to cut out extra details. If you use a plain colored paper, you may find yourself wanting to cut out some designs in the wings to add extra visual interest (this is great but can be time consuming). The sky is really the limit on a project like this, so have fun with it!

Here are some scalable templates for butterflies. Some hand drawn, the other found on an image search at Butterfly Utopia.

Wednesday, March 7, 2012

Art Journaling: Adding Pockets


While not at all necessary, at some point you might find yourself wishing your art journal had a pocket or two. There are tons of different ways to do this, and as with everything else in art journaling: none of them are wrong! One of the easiest ways to add a pocket, in my opinion, is to sew two pages together.


Start by cutting one page a little shorter than the other. This isn't really necessary, but I like being able to more easily get things out of my pockets, so having the front of the pocket shorter than the back helps.


Next, decide how you will join your pages together. Glue and tape will also work, but I decided to go with a sewn pocket. To make it easier to stitch together, I used a small hole punch to pre-punch holes. I could have sewn without pre-punching as well, but this helps to not tear my pages and weaken the pocket.


I used an embroidery floss rather than thread to make a sturdier connection. Just weave it through the holes, and knot off both ends.


The finished pocket. If you like the look of the thread wrapping around the outside of the pages rather than being in straight stitches, feel free! There is no wrong way to make your art journal.


I decided to cover the back of my stitches with washi tape. It gives the back of my pocket a nice border and covers my knots and stitches. You would never know the front of the page had a pocket sewn in.


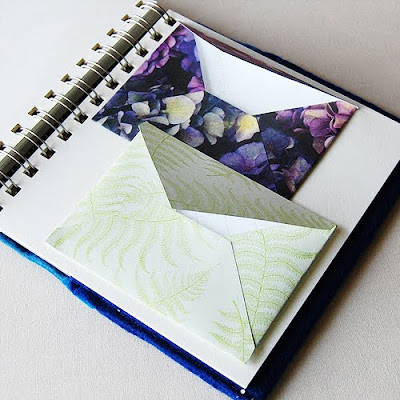
Another great pocket method is gluing envelopes onto your pages. You could use the tutorials I have here or here to try making your own, or simply buy envelopes in any color or style you like and glue them on to your pages. I sometimes add a photo corner onto my envelope to help hold it shut, or you could make a button closure like I do in my gift card envelope tutorial.


If you aren't quite sure what you would put in your pockets, here is a list of things that I have filled mine up with in the past:

Recipe cards, or recipe pages torn from magazines
Paint chips
Leaves and pressed flowers
fabric scraps
needle and thread
paper with quotes on it
photographs
stencils
or maybe one of my favorite little extras: Stickers


I got these little beauties from a Sanrio store several years ago. I think the Little Red Riding Hood theme is what draw me to them, I just love it.


What are you going to fill your pockets with?


Thursday, February 23, 2012

Art Journaling: Supplies


I know a lot of people who list journaling as something they'd like to do. Sometimes it is even a New Year's resolution. These same people usually talk, at length of how they started out pretty well, but eventually puttered out. Maybe "dear diary" journal writing just isn't your style! With one successful series behind me (on embroidery techniques) I have decided that March will be the month of the art journal! There will be lots of other projects too, but for those of you interested in journaling, and specifically art journaling: get ready for some awesome ideas, tips and tricks to make this a successful year (or month at least) in keeping a journal.

I have compiled this little list of supplies that you may want so you can follow along in March with all the great journal ideas I have for you!

To start, you will need the journal itself. I typically opt for some sort of sketchbook. To make it something I use more regularly, a small size that can fit easily into any bag, purse, etc is key for me. I also like my journals to have a coiled wire binding. This way, I can fold the whole thing open and lay it flat on a table, hands free, if I paste in a recipe or project idea I want to look at while crafting/baking etc. later on. Don't limit yourself though, If you want to paste your ideas into an old book (I'm a fan of science type journals: botanical survey books can be great!) feel free. The beauty of an art journal is you can be as free with it as you like! Just have some kind of book. You can even hole punch paper and use loose binder rings to fasten it together as you go (great if you like using varieties of paper for different media--you can insert watercolor paper just as easily as graph paper or copy paper).

Next, and especially if you have had trouble sticking to any kind of journaling in the past, find supplies that make you WANT to journal. I found these great woodless colored pencils the other day and I can't wait to use them!


I also typically have gel pens in several colors around the house, I love the way they feel in my hand when I write, so I want to write a lot! I also recommend making yourself a decorative (as well as protective) book cover. I like to use felt or other fabrics, in bright colors. Keep your journal where you will see it and the bright color will draw your eye and remind you to pick it up and write! SO pick out a fabric, felt or decorative paper you would like to see on your cover (you can also recycle the cover of an old hardcover book from a flea market if you'd like).

Have a large stack of magazines you have been meaning to get rid of, but you just can't bring yourself to do it because you know there was something in there you had to keep? Well, flip through them, tear out the things you wanted to keep and save them aside. We'll be adding these to your journal in several fun ways :)


Pick out at least one art or craft supply that you have never used before but would like to try. I purchased some stickers and my first roll of Washi tape the other day at collage and plan on using some of the tape to embellish pages throughout my journal. This is a great time to get a sample set of oil pastels, paints, stamps, stencils, etc and try them out!


Have a variety of papers to incorporate. I always get scrap book paper and cardstock when I find it on sale. Often, I have so much I don't know what to do with it: Embellish pages in your journal, make envelopes to add to pages as pockets, cut out fun shapes and more!


Some optional supplies you may want:

markers
graph paper (especially handy for quilters/embroidery buffs)
various glues
rulers
scissors
crayons
pencil sharpener
binder clips (make some fancy ones like these!)
paper punches (edge and corner punches can make your finished journal look extra cute with decorative edges)
Ribbon (decorate pages or use it as a bookmark)
tape
stickers
stamps
ink pads
paints
paint brushes
Buttons, velcro, etc to make a closure on your cover (there will be tutorials on this stuff later)
needles and thread (you can sew paper too!)

Gather up your supplies and get ready for some fun! Tutorials start on March 1st!