Showing posts with label wedding crafts. Show all posts

Thursday, November 6, 2014

New Boutonniere Tutorial on Tuts+


Hey everyone! I forgot to mention that I have a new tutorial up on Tuts+! It is for this lovely Camelia boutonniere and includes the pattern for creating the paper flower. Head on over and check it out, let me know what you think.

Perfect for a winter wedding or formal, no?


Sunday, September 23, 2012

DIY Boutonnieres


As many of you know, my sister's wedding is fast approaching and I am making all of the flowers out of paper. Today I will be sharing with you some ideas for making your own boutonnieres. These come in handy not only if you have an upcoming wedding, but also any formal dance or prom. Above you can see a variation I did in Sister's wedding colors, with some eucalyptus leaves and guinea hen feathers.


A traditional boutonniere is simply a single flower on a long stem (it is inserted into a special button hole on a men's suit lapel). As such, you will start with a single bloom on a stem, since my flowers are paper my stem is wire covered in floral tape. Make sure to leave yourself at least 3 inches of stem to work with, it may always be trimmed later.

Next you will want to decide if you are adding extra foliage or decorative "flair" to your boutonniere. You can get really creative with this: if you are doing a beach wedding, why not add some seashells or sand dollars? You could add tinsel or holly for a Christmas wedding. Simply attach any extras to some wire (you can tie the wire around the object or use glue) and then position it however you like!


Position your foliage, I used a decorative Autumn leaf, and cut a piece of floral tape to attach to your flower stem.


Make sure to wrap your floral tape snugly to prevent your boutonniere from moving or falling apart. I typically wrap each item on individually and then wrap the entire stem again once I am satisfied with the final product.


If working from the back, make sure to turn your piece over and make sure everything is lined up correctly. Make any adjustments before wrapping your stem with floral tape a final time. If you want, on your final wrapping of floral tape you can add in a pin back or alligator clip to fasten the boutonniere to a suit without the use of a long straight pin later. The final product may also be wrapped with ribbon if you don't like the look of floral tape


Which style is your favorite?

Monday, January 16, 2012

Paper Calla Lilies


Hey everyone! I'm super excited about this tutorial, as I have been toying with these flowers for over a week now trying to get them just right. I was actually unable to find any other tutorials online for making paper calla lilies, though I did see several lovely varieties on image searches. Hopefully I managed to do these beautiful flowers some justice :)

To start out you will need:

Paper in the color of your choosing (I used Lokta Fiber paper from Paper Source)
floral wire
scissors
pencil (for lightly tracing template onto your paper)
lily template (I suggest printing it out onto card stock for easier tracing)
Sculpey clay in a color of your choosing (or some other stamen, if you come up with a better idea please share it!)
floral tape
glue


You will want to print out the following template in your desired size. The great thing about making paper flowers is you can make flowers any size you want, large or small no matter what size they come in naturally.


Once I have decided on the size of flowers I am making, I start my whole flower making process on these by first making a bunch of stamens for my lilies. To do this I twist a length of floral wire to give myself a small stem, then I use Sculpey clay (available in most art and craft stores) to shape my stamens around one end of my wire. Calla lilies have really easy stamens, as they are just a long cylinder you roll out on a flat surface once you have inserted your wire. I generally make a short, fat cylinder, then insert my wire, then roll to desired length. From one package of Sculpey clay I can get about 8 stamens that are about 4 inches long and 1/4- 1/2" wide. Follow the baking instructions on your clay package to bake and set your clay.


Once you have your stamens made, it is time for the flower petals. Trace your template onto the paper of your choice. A thinner paper works quite nicely for these, as there is a lot of bending and these look a bit better without hard folds and creases. A crepe paper would work nicely, if you can find it in sheets as opposed to streamers. Cut out your petal, being careful to try and cut slightly inside your lines to avoid any pencil on your final flower.


Now, you will get to start shaping your petals. I use my fingers to start gently bending the paper into my desired shape, like so:


If you have a stiffer paper, you might want to use the back of a spoon and rub it over the surface of your paper to soften it a bit. I have a burnishing tool from a college printmaking class that I use for this, but you can also just rub with your fingers to make your paper fiber soften up and become a bit more mobile. Once you get your basic shape, you will want to shape the bottom of your flower into a cone and glue it in place.


I tend to make a perfect point at one end, as shown above. The insert the stamen, I will snip just a tiny bit off to make a hole that the wire can pass through.
Once your glue dries, you end up with this shape, a petal ready for some final shaping and a stamen:


To shape my petal, I again use my fingers to gently bend and fold the petal to my desired final shape:


Now, I insert the stamen, glue it into place and wrap my floral wire with floral tape. You can also add a longer stem and some leaves if you want to :)


I'd love to hear what you all think of how these turned out, I'm really excited about them!


Wednesday, January 11, 2012

More Tissue Paper Flowers


Here is another great tissue paper flower you can make, complete with templates. These are a little fussier than the first tutorial I showed you, but they are well worth the effort. The thing that makes these so fussy is cutting out all of the individual petals, so if you want to avoid that, I'd stick with the first version for now. You could also make these from a patterned paper with more heft, these are definitely very delicate from tissue.


To make these flowers you will need:

Tissue paper in colors of your choosing
floral wire
large glass seed beads in color of your choosing
petal template (below)
floral tape
glue
small hole punch (I used a 1/16" hole punch)*
scissors
needle nose pliers (for twisting wire, also optional, I find using my fingers works just as well, but if you are doing a large number of these you may want to give your fingers a break)


*hole punch is optional, you could also use a small needle to poke holes in the center of your petals before fanning


To start, print out the following template. I have included several different sizes of the petal shape I used so you can make different sized flowers, or make a flower with petals grading from large on the outside to small on the inside. You can further change your petal size by manipulating the image in your favorite image program, or changing the size on your printer (provided your printer has a scaling function).


Trace your petal template onto your tissue paper and cut out your petals. For my flower I cut out 7 petals, all of the largest size. It can be faster to layer several sheets of tissue paper together, but if you feel you can not cut all of the sheets evenly you can do each petal separately.


Once you have all of your petals cut out, stack them together so the centers match up. They do not have to match perfectly. Use your hole punch to punch a hole through the center of all of your petals. This will be where you thread your wire stem through all of the petals.

To create a wire stem, take some floral wire and a large seed bead (I chose purple glass seed beads, you could use plastic beads or beads in another shape if you like) bend your wire in half and feed a bead onto one end. Push the bead to the center and twist the wire around the bead tightly as shown below.


Continue twisting your wire together to create your stem. I use 26 gauge floral wire when making my flowers, so I find that twisting it together allows me not only to add beaded "stamens" of my choosing, but also gives me a thicker more stable stem for my final project. Twist all of your remaining wire together until your stem is complete.


Now, thread your petals onto your stem. If using several different sizes, make sure that the smallest petals are threaded on first, followed by the larger ones.


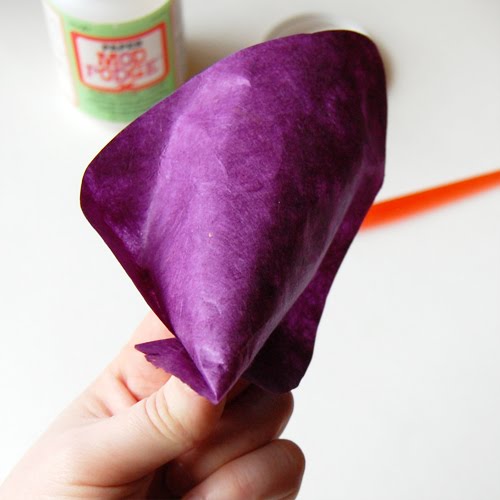
Next, fan out your petals to create the final shape you want. Use a tiny bit of glue to hold each petal in place. You may bend and fold your petals to give more volume and shape to your flower as well.


Once your glue is dry, use floral tape to cover your wire stem. I generally overlap my bottom petals a bit, pushing them against the beaded center and making my petals "pop up" a bit more. Wind the tape tightly around the entire stem to cover all of your wire. Now your flower is done and can be put together into a bouquet or vase, or you can twist the wire around your wrist as a corsage!


If you want longer, thinner petals I also have this template: I would recommend using more petals, as these will not cover the same area when fanned out.


Happy flower making!


Thursday, January 5, 2012

Tissue Paper Flowers


I'm jumping straight into paper flower making mode for my sister's wedding and I'm starting off slow with these easy tissue paper flowers. These would be great to use as aisle markers (in a larger form), cupcake toppers, or even filling in volume in a centerpiece or bouquet. They have some big bonus rewards in that they are easy enough even children could help make them by the boatload, and they come in a huge variety of colors (you are only limited by the colors of tissue paper you can find). Here is a great online shop with tons of colors you can choose from if you are without a nice party supply shop nearby. These flowers also have a variety of looks depending on how you trim your edges.

Aside from possible wedding decor, these would be great to use at a birthday party, or just to brighten up your home any old day of the week.

To make these tissue paper flowers all you will need is:

Tissue paper in your desired color
A pair of scissors
Floral wire


Start by cutting your tissue paper to size. For these small flowers, I used 4 sheets of tissue paper cut to 4"x5". Stack them on top of each other, and fold like an accordion as pictured below.


Next, find the middle of your accordion folded paper (it's easiest to just fold your paper in half again, you won't see any fold lines in your finished product). Using a piece of floral wire about 6 or 7 inches long (also folded in half) secure your paper by twisting the wire around the center of your paper like so:


I find it is easiest to work with these in a variety of ways if I leave a longer wire stem. So I twist the remainder of my wire all the way down. You can cover this with floral tape later of you wish.


Now, you get to decide what kind of edge your flower petals will have. A soft, rounded edge will give you a rounder finished flower. A sharp, triangular cut, will give you something spikier, almost like a sea urchin. You can also use pinking shears or other decorative scissors before you fold your paper to get a more subtle edge. I chose a rounded edge for this tutorial.


To make poofing out your flower petals easier, I recommend fanning out your flower before you begin, like so:


Now, all you have to do is gently pull up on each layer of tissue paper and fluff as necessary to achieve a finished look. Be careful not to tear your paper, but don't worry if you get a little snag here or there. These flowers are particularly forgiving.


Continue separating and fluffing each layer of tissue until you are done. If you want a fuller flower, feel free to use more layered sheets. You can also do multiple colors. If you want the middle of your flower to be white, make sure you have a white sheet of tissue on top of your paper pile before you fold, tie etc.

Here is my finished flower:


It can now be used as I see fit! These would even make a cute hair accessory for my nieces!