

Hey everyone! I'm super excited about this tutorial, as I have been toying with these flowers for over a week now trying to get them just right. I was actually unable to find any other tutorials online for making paper calla lilies, though I did see several lovely varieties on image searches. Hopefully I managed to do these beautiful flowers some justice :)
To start out you will need:
Paper in the color of your choosing (I used Lokta Fiber paper from Paper Source)
floral wire
scissors
pencil (for lightly tracing template onto your paper)
lily template (I suggest printing it out onto card stock for easier tracing)
Sculpey clay in a color of your choosing (or some other stamen, if you come up with a better idea please share it!)
floral tape
glue
You will want to print out the following template in your desired size. The great thing about making paper flowers is you can make flowers any size you want, large or small no matter what size they come in naturally.

Once I have decided on the size of flowers I am making, I start my whole flower making process on these by first making a bunch of stamens for my lilies. To do this I twist a length of floral wire to give myself a small stem, then I use Sculpey clay (available in most art and craft stores) to shape my stamens around one end of my wire. Calla lilies have really easy stamens, as they are just a long cylinder you roll out on a flat surface once you have inserted your wire. I generally make a short, fat cylinder, then insert my wire, then roll to desired length. From one package of Sculpey clay I can get about 8 stamens that are about 4 inches long and 1/4- 1/2" wide. Follow the baking instructions on your clay package to bake and set your clay.

Once you have your stamens made, it is time for the flower petals. Trace your template onto the paper of your choice. A thinner paper works quite nicely for these, as there is a lot of bending and these look a bit better without hard folds and creases. A crepe paper would work nicely, if you can find it in sheets as opposed to streamers. Cut out your petal, being careful to try and cut slightly inside your lines to avoid any pencil on your final flower.

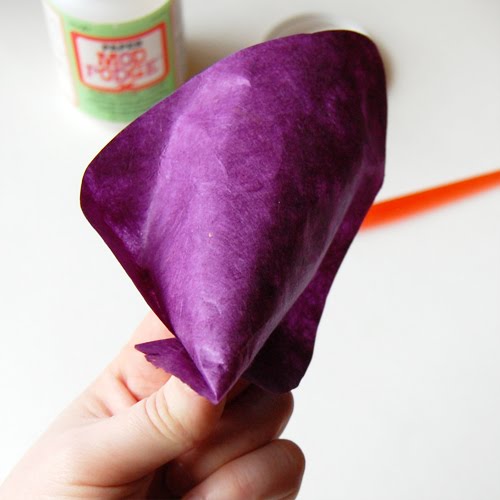
Now, you will get to start shaping your petals. I use my fingers to start gently bending the paper into my desired shape, like so:

If you have a stiffer paper, you might want to use the back of a spoon and rub it over the surface of your paper to soften it a bit. I have a burnishing tool from a college printmaking class that I use for this, but you can also just rub with your fingers to make your paper fiber soften up and become a bit more mobile. Once you get your basic shape, you will want to shape the bottom of your flower into a cone and glue it in place.
I tend to make a perfect point at one end, as shown above. The insert the stamen, I will snip just a tiny bit off to make a hole that the wire can pass through.
Once your glue dries, you end up with this shape, a petal ready for some final shaping and a stamen:

To shape my petal, I again use my fingers to gently bend and fold the petal to my desired final shape:

Now, I insert the stamen, glue it into place and wrap my floral wire with floral tape. You can also add a longer stem and some leaves if you want to :)

I'd love to hear what you all think of how these turned out, I'm really excited about them!
Very pretty. Sounds easy but I would think it is harder than you made it sound. Lol. But still going to give it a try. Thanks for sharing.
ReplyDeleteThey take a little practice, but are pretty easy overall. The hardest part for me was making the stamens, luckily you can just keep redoing them until they look right, and then bake them when you are satisfied with how they look. :)
Deletei just saw a tutorial the other day on a different type of flower and she wrapped the wire with a bit of tissue instead of clay and it seemed to work well...
DeleteMy sister made some with tissue as the stamen and it looks pretty good. I think I like the clay if you are making a cascading bouquet as it helps give the flowers some heft so they cascade better.
DeleteI'd imagine that you could make the stamen out of just curling paper.?
DeleteThis. is. awesome.
ReplyDeleteThank you! I was really excited about this post, I'm glad you like it :)
DeleteJust gorgeous!! I'll have to try them on a smaller scale so they'll fit on my cards...lol.
ReplyDeleteThank you.
ReplyDeleteI made some yesterday
http://colestoucan.blogspot.co.uk/2012/04/horses-and-butterfly.html
They look great! Well done!
DeleteI am having a real hard time making theese.But your tutorial inspires me to try over and over again. They look so lovely so I want to learn.
ReplyDeleteThey take some practice, but eventually are fairly easy to do. Just keep at it :)
Deletethese are amazing!!! i have been searching for a paper craft calla lily!!! thank you so much.
ReplyDeleteYou're very welcome :)
DeleteI am working on making paper calla lilies for my wedding, you are the first person to explain the folding portion of these!! Thank you so much! I hope it helps!! As an idea for the stamens, I used beads, wooden ones I found to be close to the perfect size while others were smaller. I just glued them to the wire stem and used a thicker type of glue to make them solid. But again thank you so much!!!
ReplyDeleteGlad I could help! Congratulations on your upcoming wedding!
Delete