Showing posts with label wedding. Show all posts

Thursday, November 6, 2014

New Boutonniere Tutorial on Tuts+


Hey everyone! I forgot to mention that I have a new tutorial up on Tuts+! It is for this lovely Camelia boutonniere and includes the pattern for creating the paper flower. Head on over and check it out, let me know what you think.

Perfect for a winter wedding or formal, no?


Saturday, July 20, 2013

Summer Fun


I'm back from another hiatus and thought I should share some of the non crafty things I've been up to in my absence, we can't be crafty all the time, right? These photos were taken from my Instagram account.

1) I participated in the Portland Heart Walk and personally raised over $200 dollars for the American Heart Association. My office had a 4 week walking challenge prior to the heart walk to challenge us to be more active every day and help break us out of our sedentary work lifestyles. Many of us still take an afternoon walk together most days of the work week. I also attended a fundraiser for the Vital Life Foundation, it is a foundation that my company founded and supports to benefit the local community and the residents in our long term care facilities.

2) The hot weather has seen the husband and I going on many a date night to avoid cooking at home and making the place extra hot (Portland is a place that doesn't seem to believe in air conditioning, almost no rentals have it and very few homes have anything above a window unit). It has been a good excuse to spend time together having fancy Happy Hour food and drinks though, so I can't complain too much.

3) Hen party with S'Mores! Leave it to me and my friends to find a great place for a bachelorette party that serves DIY S'mores with a little campfire and everything! I think I may need to get one of the little cast iron "campfire" things myself so I can make my own table top S'mores in the future.

4) Summer in Portland means lots of boats on the river and bridges being raised to accommodate them. It's kinda cool to watch on the weekends (and it makes me thankful I don't work on the other side of the river during the week).


Finally, the hus and I attended the wedding of a couple dear friends last weekend. They were married in Cathedral Park near the St. John's bridge here in Portland. We decided to use my talented husband's painting gifts and create a large painting of the bridge for them to hang in their new home. I'm pretty proud of my guy for being so talented and I know the bride and groom were really touched by the gift. I'll be honest, the only thing I had to do with this is it was my idea, I'm no painter. I just had to share this with all of you as I love the painting and like to brag a little every now and then :)

What has the Summer had in store for you so far?

Sunday, September 23, 2012

DIY Boutonnieres


As many of you know, my sister's wedding is fast approaching and I am making all of the flowers out of paper. Today I will be sharing with you some ideas for making your own boutonnieres. These come in handy not only if you have an upcoming wedding, but also any formal dance or prom. Above you can see a variation I did in Sister's wedding colors, with some eucalyptus leaves and guinea hen feathers.


A traditional boutonniere is simply a single flower on a long stem (it is inserted into a special button hole on a men's suit lapel). As such, you will start with a single bloom on a stem, since my flowers are paper my stem is wire covered in floral tape. Make sure to leave yourself at least 3 inches of stem to work with, it may always be trimmed later.

Next you will want to decide if you are adding extra foliage or decorative "flair" to your boutonniere. You can get really creative with this: if you are doing a beach wedding, why not add some seashells or sand dollars? You could add tinsel or holly for a Christmas wedding. Simply attach any extras to some wire (you can tie the wire around the object or use glue) and then position it however you like!


Position your foliage, I used a decorative Autumn leaf, and cut a piece of floral tape to attach to your flower stem.


Make sure to wrap your floral tape snugly to prevent your boutonniere from moving or falling apart. I typically wrap each item on individually and then wrap the entire stem again once I am satisfied with the final product.


If working from the back, make sure to turn your piece over and make sure everything is lined up correctly. Make any adjustments before wrapping your stem with floral tape a final time. If you want, on your final wrapping of floral tape you can add in a pin back or alligator clip to fasten the boutonniere to a suit without the use of a long straight pin later. The final product may also be wrapped with ribbon if you don't like the look of floral tape


Which style is your favorite?

Thursday, August 2, 2012

Easy Vellum Flower


I have been slaving away making flowers for my sister's wedding (it also helped pass the time while I was waiting for a replacement lens for my camera to arrive). As such, I was not really able to post in July, so I hope you all haven't been too mad at me. Fear not, the new lens has arrived and I am almost finished cutting out all of my sister's lovely wedding flowers.

While my sister decided on mainly paper roses, which can be found as part of my paper flower roundup post. I have come up with some cute and much easier flowers that can be used to fill in bouquets. A great thing about these flowers is that they work especially well with this great platinum vellum paper I found! Vellum doesn't like to be bent/shaped/hot glued the way copy weight papers do, so finding a simple flower with less fuss is a great way to use it. The shimmer of the paper also makes this simple flower look a bit more exciting. It's a win/win!


I started this flower by using the template from some of my tissue paper flowers, as shown above. I decided that cutting out 3 same sized petals, punching a small hole in the center, and arranging them around a simple bead on a wire looked simple and elegant, and was also pretty darn quick and easy! I used a tiny bit of glue between each petal to hold them in place. You could also cut out 3 petals of each size and make a larger, layered flower. I think a bouquet made entirely of these little beauties would be a great everyday centerpiece or table decoration!

I'll be posting again tomorrow to let you all in on my upcoming projects! If you can't stand the suspense, check out my July Newsletter! What have you all been up to during my unplanned break?

Sunday, May 27, 2012

Ombre Pom Pom Centerpiece


I was browsing Pinterest the other day (shocker, I know!) and came across a centerpiece similar to this one that was made with white carnations. Since I am helping my sister with the flowers for her wedding, and we are making them all from paper, I decided to try out a version with tissue paper pom pom flowers. I also wanted to get a little extra fancy, so I did an ombre arrangement starting with a white flower at the top and moving down into a dark blue at the base. This is a pretty easy arrangement to make, and would look great not only at a wedding, but a baby shower or birthday party!


The base for the arrangement is simply a candlestick (I snagged mine at the dollar store!) and a styrofoam ball (mine is 4" in diameter).

You will also need a bunch of tissue paper pom pom flowers, with a wire stem long enough to poke into your styrofoam ball. My finished centerpiece has a total of 25 flowers on it, made from pieces of tissue paper that were 4"x6". I left about 2" of stem on each (to make your stems sturdier you may want to double them over and wrap them with floral tape). Depending on the size of your styrofoam ball, the size of your flowers, and how densely you want to place them, you may need more or less.


I decided I didn't want to glue my styrofoam to the candlestick, so I could use it again later if I wanted to for another project. So to start, I placed my darkest color blue flowers around the candlestick base to hold it in place. I fluffed up my flowers and then moved o the next color. I also placed my single white flower at the top as a reference point so that my flowers wouldn't get too crooked as I built upwards.


Continue placing flowers and fluffing until you are satisfied with your finished product! If you don't want these as a centerpiece they would also be great as decoration on a dessert table, and if you want a taller base you could easily use a tall slender vase instead of the candlestick. :)

Thursday, April 26, 2012

Criss Cross Bouquet Tying


If you liked yesterday's post on the basics of tying a bouquet you may be interested in this, only slightly more difficult way to embellish your bouquet. This criss cross method uses a second color of ribbon to add some extra color and style to your bouquet. Start the same way you did for the basic bouquet, but before adding your pins you will add in your second ribbon.


I started with a 2.5 yard piece of purple ribbon and pinned it in the middle to my base ribbon. Then you wrap each side around the stems crossing each other as you go.


Rather than pinning a straight line down the back of this bouquet variation, I chose to only pin in the center of each crossing section on the back of my bouquet (this will be facing the person holding the bouquet).


The front of the bouquet is finished at the bottom, by tying a bow where your ribbon ends cross. If you choose, you can leave the ribbon ends as long as you like or trim them shorter. I think leaving the extra long ends has a luxurious feel to it, so I typically don't trim them off.


As with all bouquets, this one is finished off by trimming all of your stems to the same length.


Wednesday, April 25, 2012

Basic Bouquet Tying Technique


This may be what we think of when the word "bouquet" comes to mind. If you have wedding plans in the mix, though, you may be just as concerned with ways to tie your bouquet! This is a tutorial for a very basic way to tie and wrap your bouquet to create the lovely handle seen below.


This handle is simple in that it is simply overlapping ribbon with some decorative corsage pins inserted in a line down the back.


Here are some supplies you may find helpful in doing this tutorial yourself: Ribbon, floral tape, scissors, corsage pins, and floral wire (you will of course, also need a lovely bouquet of flowers).


To start, arrange your bouquet in any way you most prefer. For this tutorial I used real flowers, but I love the versatility of using paper flowers with wire stems, so be sure to check back for a tutorial that is more specific to handmade flowers with wire stems later on. You will want to remove most of the leaves on the stems that are located where you will be making your handle. Leaving the stems on makes a lumpy surface for tying your ribbon.


Once you have your flowers arranged, tightly wrap your stems together with floral tape. This will hold your bouquet together tightly and be a good "canvas" for your decorative finish. If necessary, you can use a piece of floral wire, or some rubber bands to hold your stems together while you tape them tightly.


I recommend taping your stems as far down as you plan on wrapping your ribbon, as you can see above. At this point, you can trim the bottoms of your stems to an even length, or you can wait until you are all done with your pins and ribbon. Just make sure that your final piece has stems that are all one length, or your finished bouquet will look a little sloppy.

Now you are ready to wrap your ribbon around your stems. I generally start by using a piece of waterproof tape and taping the end of my ribbon up at the top of my stems and wrapping the ribbon downward. GO as slowly as you need, just try to wrap your ribbon tightly around the stems to avoid puckers and gaps. Once I get to the end of where I want my stems wrapped, I work my way back up to the top with a second layer of ribbon wrapping. This ensures a more even coverage and leaves you with both ribbon ends at the top of your bouquet. Since the bottom of your bouquet is most likely to be seen, it helps your finished look by having all ends at the top.

Now, you will add your corsage pins. It isn't necessary to pin all the way down, but it can give a nice finished look. TO space evenly, I lined up my pin tips with the tip of the leaf in front of it. It can take some practice to get a straight line (I'm not used to using shaped pins, so as you can see mine could use a little work). If you are just starting out, simple pearl corsage pins are easiest to line up.


Voila! Here is a bouquet all tied and pinned! You can use any color and width of ribbon you prefer, along with any color and shape of pins you can find. If this seems a little plain for your taste, be sure to check back over the next couple weeks as I will be giving tutorials on several ways to embellish your bouquet handles, and different materials you can use for tying them all up.

Wednesday, January 25, 2012

Paper Flower Roundup


As promised, here is a roundup from around the web of some gorgeous paper flowers! All of these would be great for weddings, home decor or a gift for your special someone this Valentine's Day!

Above you will see a rose that I made thanks to a great tutorial and template from Ellinee. I tried several roses, I will post more photos of mine at the bottom of this post, and I can say that regular copy paper (or paper of a similar weight) is easiest for these, though you can also make them with card stock and vellum without too much trouble. I really love these as I have seen several tutorials for roses around the web that are either too simple and so don't look very realistic or need you to cut out every single petal individually (and who has the time to do all that?).

The rose template even comes in several colors so you could print it out onto white copy paper and get a variety of colors! I chose to print out a template onto card stock and trace it onto some fancier paper I had lying around. I also left out the leaves and glued mine into stems so I could make a bouquet. To add a stem, just poke a little hole in the center of your petals and string them on, in the correct order, before gluing them in place.


Of course, no paper flower roundup is going to be complete without mention of my own tutorials! If you happened to miss them, I made a couple of cute tissue paper flower tutorials: Tissue paper pom pom flowers and tissue paper flowers with individual petals.


My favorite of my own tutorials was, of course, my paper calla lilies.


If crepe paper is more your style, there are a multitude of varieties available with tutorials from Martha Stewart Weddings. These even have tutorials for making several varieties of faux stamens to build your flowers around!


Are you into quilling? Then these double fringed flowers from Inna's Creations might be right up your alley. I haven't tried these out myself yet, but when I do I will be sure to let you all know how they turned out :)


Have some leftover party streamers? Check out these cute centerpieces. It's an easy version of a poppy and the crepe paper streamers used are readily available (I know I've seen some in my local dollar store!).


Have you seen any paper flower tutorials that shouldn't be missed? Let me know, I'd love to check them out!


Here are some more of my paper roses. Which is your favorite?


Monday, January 16, 2012

Paper Calla Lilies


Hey everyone! I'm super excited about this tutorial, as I have been toying with these flowers for over a week now trying to get them just right. I was actually unable to find any other tutorials online for making paper calla lilies, though I did see several lovely varieties on image searches. Hopefully I managed to do these beautiful flowers some justice :)

To start out you will need:

Paper in the color of your choosing (I used Lokta Fiber paper from Paper Source)
floral wire
scissors
pencil (for lightly tracing template onto your paper)
lily template (I suggest printing it out onto card stock for easier tracing)
Sculpey clay in a color of your choosing (or some other stamen, if you come up with a better idea please share it!)
floral tape
glue


You will want to print out the following template in your desired size. The great thing about making paper flowers is you can make flowers any size you want, large or small no matter what size they come in naturally.


Once I have decided on the size of flowers I am making, I start my whole flower making process on these by first making a bunch of stamens for my lilies. To do this I twist a length of floral wire to give myself a small stem, then I use Sculpey clay (available in most art and craft stores) to shape my stamens around one end of my wire. Calla lilies have really easy stamens, as they are just a long cylinder you roll out on a flat surface once you have inserted your wire. I generally make a short, fat cylinder, then insert my wire, then roll to desired length. From one package of Sculpey clay I can get about 8 stamens that are about 4 inches long and 1/4- 1/2" wide. Follow the baking instructions on your clay package to bake and set your clay.


Once you have your stamens made, it is time for the flower petals. Trace your template onto the paper of your choice. A thinner paper works quite nicely for these, as there is a lot of bending and these look a bit better without hard folds and creases. A crepe paper would work nicely, if you can find it in sheets as opposed to streamers. Cut out your petal, being careful to try and cut slightly inside your lines to avoid any pencil on your final flower.


Now, you will get to start shaping your petals. I use my fingers to start gently bending the paper into my desired shape, like so:


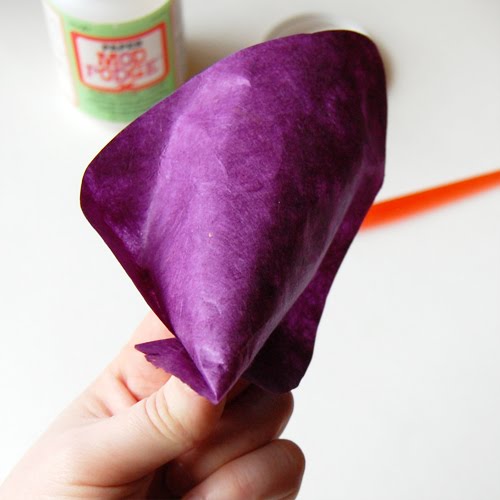
If you have a stiffer paper, you might want to use the back of a spoon and rub it over the surface of your paper to soften it a bit. I have a burnishing tool from a college printmaking class that I use for this, but you can also just rub with your fingers to make your paper fiber soften up and become a bit more mobile. Once you get your basic shape, you will want to shape the bottom of your flower into a cone and glue it in place.


I tend to make a perfect point at one end, as shown above. The insert the stamen, I will snip just a tiny bit off to make a hole that the wire can pass through.
Once your glue dries, you end up with this shape, a petal ready for some final shaping and a stamen:


To shape my petal, I again use my fingers to gently bend and fold the petal to my desired final shape:


Now, I insert the stamen, glue it into place and wrap my floral wire with floral tape. You can also add a longer stem and some leaves if you want to :)


I'd love to hear what you all think of how these turned out, I'm really excited about them!