Showing posts with label wedding favors. Show all posts

Monday, April 7, 2014

DIY Beeswax Tart Candles


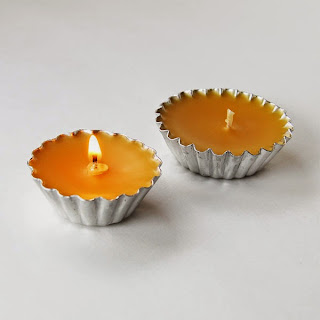
I've been working on some craft ideas that would make cute little gifts lately (you know, wedding season is fast approaching). These cute little candles fit the bill! I used mini tart pans from the kitchen goods store in my neighborhood (about 50-60 cents a piece) as the containers for my candles. The wicks, wax and honey almond scent are from Bulk Apothecary, they aren't paying me for saying that- I just really like ordering my candle making/lotion making supplies from them, they have all kinds of awesome stuff.

To make these candles at home you will need:


Beeswax (If you can find it in the tiny pellets, I recommend it. Grating whole blocks of wax is tedious)
candle wicks
containers (I used mini tart shells)
Fragrance oil (optional) Beeswax does have a subtle scent on its own, and you certainly don't need to scent your candles if you prefer them to be more plain
Glass bowl* (to create a double boiler)
stirring utensil* (I use a plastic spoon)

*I always recommend that you use a bowl and spoon for making candles/beauty products that you do not eat with. I got a pack of plastic spoons as well as a glass bowl at the dollar store. I always hand wash these items and keep them separate from the dishes we eat with.


To start, I measure out my wax pellets. I wanted my tart shells to be pretty much full, so I filled each tarts hell I was using so it was heaping with pellets and dumped them into my glass bowl. I then added a couple extra Tablespoons of pellets just in case any got spilled when filling my candles.

I had ordered a large quantity of 3" long wicks, so I trimmed them a bit before placing them in the tart pans (to about 1.5"). Once the candles are done, you can trim the wicks further if needed.

Place your glass bowl of wax over a pot of simmering water. This will slowly melt the wax. You will want to stir the wax until it is all melted and then add any fragrance if you wish to do so. I added about 12 drops of fragrance for my 3 small tart candles, but if you like a stronger fragrance you can add more.

Once the wax is melted and the fragrance has been stirred in, you can start to fill your candles. I always place the objects I am filling on top of some freezer paper and/or an old towel in case I spill any wax while pouring. Cleaning wax off a table or counter top is a huge hassle. If your candle mold is small, like mine, you may want to use a spoon to spoon the hot wax into your mold (I also found some measuring cups that have a little spout on one side that work well for pouring the wax--again, I do not use these for any other cooking). I always fill my molds up to the top, as the wax settles just a tiny bit when cooling.


Once the wax has cooled and hardened, I trim my wicks so they are about 1/4" long. You are ready to wrap these up as a gift or use them around the house! These would be a great wedding or baby shower favor, and the materials can be bought in bulk online.


What are your favorite little gifts to make yourself?


Wednesday, January 4, 2012

Goodbye 2011, Hello 2012!


Hello everyone and welcome to 2012! If you are like me, 2011 kind of went by in a blur and left you in the dust (hence this post not coming until January 4th!). First of all I want to take a minute to thank each and every one of you for joining me here on The Craftinomicon, whether this is your first visit or just another one of many. I love writing these blogs, but without anyone to share them with I'm sure I'd eventually give it up. All of your comments, questions, emails, etc. are genuinely appreciated by yours truly.


The picture above shows several of my favorite projects and recipes from the past year. I can only hope I manage to outdo myself this year with even more great projects for you all to try out yourselves! The Holidays actually brought me and my family some very good news that will be the inspiration for some super awesome crafty projects this year.

First off, my cousin Lindsey and her husband announced on their Christmas card that they are expecting their first baby, due in late June! Everyone is quite excited and you can rest assured that there will be several baby themed projects making their way to the blog the first half of the year (and probably on through to the end!).


Second, and what I am probably most excited about, my little sister got engaged just a couple days after Christmas! Aaaah! Congratulations again, Katie and Isaiah! I am super duper excited! Being the crafty older sister, I am going to be providing ideas and likely several final projects for their special day! If you are planning a wedding or know someone who is, you will definitely want to keep coming back for some great tutorials on centerpieces, paper flower arrangements, folding several varieties of paper flowers, wedding accessories and more. We are frugal people, so these tips will be especially worth note to those of you who are being budget savvy this new year!


I also have a few crafty New Years resolutions that will be making their way onto the blog, as well as into my newsletter.

1) I am going to learn how to make soap this year. I have wanted to try it for awhile, but I am finally going to put forth the effort to research, buy the necessary supplies and then get to work experimenting on making my own soaps! If this is something you've always wanted to try too, get ready for a great journey into the world of soap making with me! If you have any resources that you would highly recommend, I would also appreciate them!

2) I am going to start including scrap projects monthly! My scrap projects ideas and scrap project roundup from this past year were really quite a hit, and the ideas don't stop there, so once a month (maybe more!) I am going to let you in on some great projects to use up scrap fabrics, papers and more!

3) For those amongst us trying to be a little healthier in 2012, I will be trying to limit my sinful dessert recipes on Friday Food Craft posts to only one or 2 a month. Other posts will likely have yummy dinner recipes, including a lot more veggies! I am also gong to be making some yummy breads and side dishes to liven up the everyday dinner fare.


Do you have any crafty resolutions? Are there any projects in 2012 you can't wait to start? I'd love to hear all about them!


Posts featured in above photo are:

Alice in Wonderland painted coaster
Humpback Whale Plush
Easy Bruschetta
Gift Card Envelopes
Make Your Own Bath Salts
Squid Drinking Glass
Hotdogtopus!
DIY gift bows


Wednesday, July 6, 2011

Make your own Bath Salts

With Wedding season well upon us, I thought I'd share a quick and inexpensive idea that could be used as a wedding favor (or even centerpiece) at a wedding. These bath salts are easily customizable, can be put in any sort of packaging you like and the materials are easy to find and don't break the bank! (No weddings in your future? These would be great party favors at almost any occasion, and the packaging you choose really changes the whole effect!)

First, for the bath salts themselves you will need:

Epsom Salts
Baking Soda (a natural moisturizer)
Essential Oil (for these I used Lavender, but you may choose any scent you enjoy--I generally use Peppermint if I'm making a foot soak)

When making a small batch for myself I use 1 cup of Epsom Salts, 1 Tablespoon of Baking Soda and 2-3 drops of Essential Oil.

I generally prefer to leave mine white, but a drop or two of food coloring can be used to color the salts, or mica pigments can be found online or in soap making shops if you prefer a more natural way of coloring yours.

Next, a container will be needed to present and store your bath salts. What better way to celebrate you and your partners "great chemistry" than by using test tubes? I have places mine into a graduated cylinder so they don't go rolling all over the table. If you look online you will see that these can be purchased in large quantities very cheaply, and in many variations. I like the look of glass with corks, but you may find it more suitable to use plastic tubes with screw-on caps.

Rather than Test tubes, maybe you would want to place your bath salts in decorative mason jars. These could be different sizes as well, and make quite a nice table centerpiece, mixed with jars of flowers or candies.


I also know that M&M's makes personalized candies that would work with this as well. You can get them in your wedding colors, or with images on them! Test tubes would again be a great container, as they fill up rather quickly to keep the overall cost down, but still look great. Or fill larger containers so guests can nibble during the reception.