Monday, January 16, 2012
Paper Calla Lilies
Hey everyone! I'm super excited about this tutorial, as I have been toying with these flowers for over a week now trying to get them just right. I was actually unable to find any other tutorials online for making paper calla lilies, though I did see several lovely varieties on image searches. Hopefully I managed to do these beautiful flowers some justice :)
To start out you will need:
Paper in the color of your choosing (I used Lokta Fiber paper from Paper Source)
floral wire
scissors
pencil (for lightly tracing template onto your paper)
lily template (I suggest printing it out onto card stock for easier tracing)
Sculpey clay in a color of your choosing (or some other stamen, if you come up with a better idea please share it!)
floral tape
glue
You will want to print out the following template in your desired size. The great thing about making paper flowers is you can make flowers any size you want, large or small no matter what size they come in naturally.
Once I have decided on the size of flowers I am making, I start my whole flower making process on these by first making a bunch of stamens for my lilies. To do this I twist a length of floral wire to give myself a small stem, then I use Sculpey clay (available in most art and craft stores) to shape my stamens around one end of my wire. Calla lilies have really easy stamens, as they are just a long cylinder you roll out on a flat surface once you have inserted your wire. I generally make a short, fat cylinder, then insert my wire, then roll to desired length. From one package of Sculpey clay I can get about 8 stamens that are about 4 inches long and 1/4- 1/2" wide. Follow the baking instructions on your clay package to bake and set your clay.
Once you have your stamens made, it is time for the flower petals. Trace your template onto the paper of your choice. A thinner paper works quite nicely for these, as there is a lot of bending and these look a bit better without hard folds and creases. A crepe paper would work nicely, if you can find it in sheets as opposed to streamers. Cut out your petal, being careful to try and cut slightly inside your lines to avoid any pencil on your final flower.
Now, you will get to start shaping your petals. I use my fingers to start gently bending the paper into my desired shape, like so:
If you have a stiffer paper, you might want to use the back of a spoon and rub it over the surface of your paper to soften it a bit. I have a burnishing tool from a college printmaking class that I use for this, but you can also just rub with your fingers to make your paper fiber soften up and become a bit more mobile. Once you get your basic shape, you will want to shape the bottom of your flower into a cone and glue it in place.
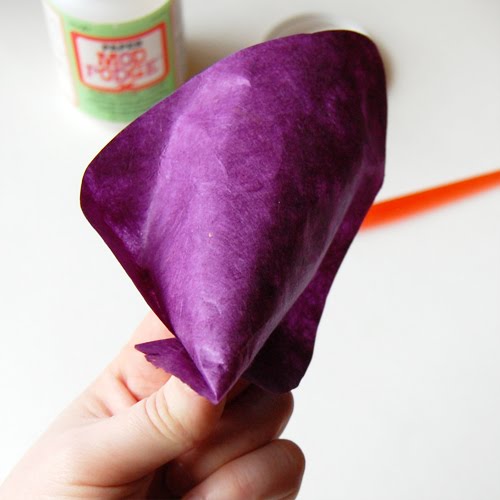
I tend to make a perfect point at one end, as shown above. The insert the stamen, I will snip just a tiny bit off to make a hole that the wire can pass through.
Once your glue dries, you end up with this shape, a petal ready for some final shaping and a stamen:
To shape my petal, I again use my fingers to gently bend and fold the petal to my desired final shape:
Now, I insert the stamen, glue it into place and wrap my floral wire with floral tape. You can also add a longer stem and some leaves if you want to :)
I'd love to hear what you all think of how these turned out, I'm really excited about them!
Friday, January 13, 2012
Friday Food Craft: Pizza Monkey Bread
I got a little creative with things in the fridge the other day and this is the result: pepperoni pizza monkey bread. It was pretty tasty, and I'm sure I will try it again. Once again, it gave me reason to own a bundt pan, but if you don't, you could also make these in individual serving sizes in muffin tins (baking time will be much lower).
To make this monkey bread at home you will need:
One can of your favorite refrigerated biscuit dough (making 8 biscuits), or mix up a batch of your favorite biscuit dough from scratch
1 small package of pepperoni (we had some leftover from a large package from pizza night)
About 5 Tablespoons pizza sauce (you can use more or less depending on your taste)
1/2 cup shredded mozzerella cheese
1/2 stick butter, melted (add some garlic if you like!- I Do!)
Preheat your oven to 350 degrees, and lightly grease your bundt pan. Set aside.
Open your biscuit dough and cut each biscuit into four pieces (you may cut smaller pieces if you wish, mine were just a bit more than "bite size"). Set these on a plate, and prepare your other ingredients.
Once you have everything ready, dip your biscuit pieces into your butter (or garlic butter) and start to layer your monkey bread into your greased pan. Since the bottom will become the top, I generally start by layering in some pepperoni so it will look kinda nice when I turn the pan out. I'll be honest, I wasn't very particular in making this, just layer in each ingredient the way you see fit: some pepperoni, some biscuit pieces, some sauce and some cheese. Layer until you are out of stuff. If you want extra toppings in your bread, you can always flatten out your biscuit pieces, place some toppings in the center and fold them up before layering the biscuits in the pan!
Put into the oven and bake at 350 degrees for 30-35 minutes, until your cheese and biscuits have reached your desired level of golden brown and delicious. If you use more sauce it might take a little longer (so you don't have soggy biscuits).
Turn out onto a plate and serve warm.
This is a great way to use up leftovers from a pizza or pasta night, as I did. You could also add peppers, olives, etc to change it up a bit. Enjoy :)
*Also note, if you prefer you can leave the sauce out of the actual monkey bread and serve it on the side for dipping.
Labels:
bundt pan,
food crafts,
monkey bread,
pizza
Thursday, January 12, 2012
DIY Magazine Envelopes
As promised, here is a tutorial on making your own envelopes for stationery sets. While this template makes a rectangular envelope, you could certainly modify it to make squares as well, and as usual this image is scalable (the actual jpg is quite small, I printed it at 250% to make the cute envelopes shown in the tutorial--I just like cutesy small stuff, my original envelopes were much larger).
To make these envelopes you will need:
Paper or magazine pages of your choosing.
scissors or an X-Acto knife
a ruler
Envelope template (below)
glue (elmer's or glue sticks work just fine--if you do not have glue, you can go without and use stickers to close your envelope as well)
Start by printing the following template to your desired size:
Cut out your template and trace it onto your paper of choice. You could use scrap booking paper, thicker card stock, magazines, maps, old book pages, etc. For this tutorial I decided to use a jewelry advertisement from a magazine. The rose and jewelry are very Valentine's Day appropriate, don't you think? You could also use home and decor magazines to make envelopes for a housewarming party, or wedding magazine's for wedding invites and thank you's!
Once your image is cut out, as show above, you will want to take a ruler or other straight edge to aid you in folding your envelope flaps in evenly. I generally use the ruler as a guide and push my paper up against it to give me a general line of where my fold will go. If using thicker paper, you can gently score your paper to give a more defined guide, just be careful not to cut all the way through.
Now, you will want to fold all the flaps in with a harder crease. Turn your envelope over to the "pretty side" to decide which end you want to be the top and bottom. I generally like to fold over a straight edge on my "bottom" flap, but you can always leave all the points if you like that look.
Now, you will use your glue (very little is needed, so I generally use a brush to make a thin layer, or use glue stick) to glue down the bottom flap to the two side flaps. Here is your finished envelope!
If mailing these, I use white address labels to make it easy to read. You could also use white or silver paint pens on dark envelopes like this, just make sure to print clearly so the postal service can get it where it needs to go.
Labels:
custom envelopes,
diy,
easy,
paper crafts,
stationery,
template,
Valentine's Day
Subscribe to:
Posts (Atom)


