Showing posts with label felt. Show all posts
Thursday, March 1, 2012
Art Journaling: Easy Felt Cover
I'm starting out easy in my Art Journaling tutorial series, as I've been out of commission with a really bad cold. This felt cover is a cheap and easy option for covering a sketchbook to use as your journal. I like this on any sketchbook with a wire binding because it keeps the binding covered so it doesn't snag on things when you put it in a purse or backpack to carry around with you, but still allows you to open your book all the way so it can lay flat on a table. Here is a very rudimentary diagram for you to check out:
Essentially, you just need one long rectangle of fabric (in my case, felt). You will fold on the dashed lines to create pockets for the sketchbooks original front and back cover to be inserted into (just sew along the top and bottom after you fold and voila-pockets!). You could also use 3 separate pieces of fabric, a main body and two separate pieces to sew on to create the pockets, just make sure you leave room for your seam allowances. Since everyone might have a different sized sketchbook, just make sure you measure the dimensions of your sketchbook (don't go by what the cover tells you-my 6"x6" sketchbook was actually a tad larger when I measured). Add enough extra for your seam allowances (I leave my raw edges on the outside since I use felt, so my seams are only 1/4", yours may be 1/2" or anywhere in between).
To be a little fancier, I decided to use 4 shades of blue and sew them together to get my rectangle. This gives me an ombre effect on my cover going from lightest to darkest.
Once you sew up your felt, you simply slide your front and back covers into the pockets you created. I made my pocket flaps about 4" wide so they cover up a large portion of the original covers, and ensure they stay on my cover.
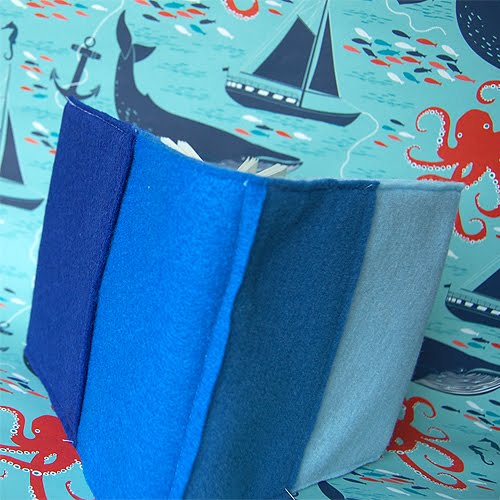
Here is my cover, all sewn, slipped on and opened up. I kept this pretty straight forward. If you wanted, you could add a closure like a strap with velcro or a snap. I will probably make a much more detailed tutorial once I'm feeling 100% over this cold I have with tons of variations on what you can add to it.
If you are real lucky, like me, when you go to open your sketchbook and start measuring to make your cover, you will find a cute little note like this from your husband that has been sitting inside for a week. :)
Labels:
art journal,
book cover,
fabric book cover,
felt,
journal
Tuesday, February 7, 2012
Rain Cloud Brooch Pattern
I was looking through some of my old projects the other day and decided that this little guy really didn't get the love he deserved. Sure, it's a rain cloud, but it's a cute little rain cloud, right? These are super easy to make, can be customized with lots of different things, and if you don't like hand sewing, just bust out the glue gun!
Here is my cloud pattern if you don't feel like drawing out your own:
The final measurements of my cloud, when stuffed are about 2.5" wide and 1.5" tall.
To make your own cute little rain cloud brooch, cut out 2 of your cloud pattern from the felt color of your choice and sew or glue them together on the edges, filling with a little batting or a cotton ball so it's squishy and soft. I used silver jewelry chain to make my "rain" and added a little blue glass bead to one of my chains. I used a little hot glue to secure the chains in place on the inside of my felt cloud pieces.
Then, I hand stitched a pin back to the back of my cloud to secure it. You could use hot glue, or some other kind of glue if you'd prefer, but not many glues work well for both fabric and metal, so you may find it loosens over time and needs to be glued back on at some point. A few stitches really help make a permanent connection, and most pin backs you will find in the craft stores have a few holes in them to make sewing them onto fabrics pretty easy.
Thursday, August 4, 2011
Shark Plush
Here is a cute little felt shark project for you all. There is a template at the bottom of this post, you can resize it in your favorite image software to make a plush shark that is as large or small as you like! Also, upon looking at the pattern, I would say that if you make 2 of the top (main body) pieces large enough for a dog, you could easily turn this into the pug costume I showed yesterday with only a couple tweaks. What on earth would I use a felt shark for, you ask? Well, you could make several of these and turn it into a shark mobile, attach a magnet or pin back to a smaller version and you have those options as well. Or just give your sewing area or desk its own little shark invasion. Go nuts!
To make this shark you will need to cut out 2 of the main body pieces and one of the bottom pieces (the ones without the tail). As you can see from my picture, any color will do. I happened to fancy a green and magenta shark, you could certainly be more realistic. Add button eyes if you want, you could also embroider on some eyes, gills, etc. Add a mouth and teeth if you are so inclined. The pattern is simple, so lends itself to any embellishments you want to add yourself!
Labels:
felt,
plush,
sewing,
shark,
Shark Week
Friday, April 8, 2011
Butterfly Collection Pillows!
It has been a very busy week! Lots of working, laundry, packing and gift making for my upcoming trip to Wisconsin to see my family. I'm excited for the trip but I am also exhausted from all the work! Here is the final outcome of my butterfly project from a couple days ago, butterfly collection pillows! These butterflies would make a lot of other great projects as well: tote bags, a sciency looking butterfly pincushion maybe? Some wall art, shadow box, etc. The best part is you only have to sew around the little body shapes so the wings are free to give your project extra dimension.
For the butterfly template I used, check out this post.
I got the original idea for this project at Ruffles and Stuff but I liked a more intricate butterfly, and wanted to use brighter colors.
For the butterfly template I used, check out this post.
I got the original idea for this project at Ruffles and Stuff but I liked a more intricate butterfly, and wanted to use brighter colors.
Tuesday, April 5, 2011
Spring is in the air!
It is an absolutely beautiful day outside! I know I have been MIA in the crafts department as of late, but I assure you it is a time constraint, not a lack of crafting that is keeping me from you all. I am taking a trip to Wisconsin next week to visit my family and have been hard at work on gifts for them (nothing is actually finished yet, I'm multi-tasking them all at the same pace to be done Friday).
This is going to end up being projects for my grandmother and my sister-in-law, for their respective birthdays. I thought the butterflies and bright colors were fitting for the day, and it will give you all a chance to start guessing at what I am making. I also have a little template photo you can use to make your own colorful butterflies! These would also make a great paper craft, but for now I'm sticking with the felt and sewing projects at hand. You could also find some images of your favorite type of butterfly, or many different butterflies to make a more diverse collection. I'm hoping to get the finished project(s) done and posted for you all tomorrow!
What kind of ideas do you have for springtime colors and/or butterflies?
Wednesday, March 23, 2011
Rain Cloud Brooch
Today was actually a very nice day in Portland, sun and everything. So, I guess I must have missed the rain, as I decided to make this cute little rain cloud brooch. I even added a little light blue glass bead rain drop, though I think the silver chain looks nice on its own as rain. A little stuffing, a little glue and a pin back and voila! a nice little rain cloud, only this one won't leave you all wet and gloomy.
Tuesday, February 22, 2011
Felt Containers
If you are like me, you have little bits of this and that all over the place. These things need a home. What better home than a little fabric container, in this case: felt.
I used two colors of felt to give the containers some extra strength as well as being extra nice to look at.
They are then sewn together to make a little box (you could get really fancy and make a matching lid if you wanted to keep your odds and ends hidden from view--just make sure to add a little extra length so it fits around the box itself).
Insert your treasures and you are ready to go!
This box is currently holding some spools of thread I don't have room for anywhere else (it's getting a little crowded by the sewing machine lately). You can make these boxes any size you like from teeny tiny to extra huge, just keep in mind that the larger you make them the more flimsy they will be. You may want to add some interfacing or extra layers of felt or batting to help them keep their shape.
Labels:
box,
felt,
home organization,
sewing,
storage
Subscribe to:
Posts (Atom)


