Friday, August 26, 2011

Friday Food Craft: Roasted Vegetable Pasta Salad

Welcome to another yummy food craft everyone, and HAPPY FRIDAY! This week I decided to take a step away from desserts and give you this yummy roasted vegetable and Orzo salad. It's great for picnics, tastes great hot, warm or cold and you can change it up with whatever veggies happen to be in season. It can be served as a side, or even as a whole meal itself, I'm a big fan. For this version of my pasta salad I use zucchini, roma tomatoes and an orange bell pepper as my veggies. If you want to do this gluten free, feel free to substitute quinoa or rice for the pasta (I'd recommend the quinoa as I have used it in the past with great results).

To make some yummy roasted vegetable pasta salad for yourself you will need:

1 small zucchini (about 8" long and 1-2" across)
1 medium Orange Bell Pepper
4 Roma Tomatoes
1 pound (16 ounces) Orzo, or other pasta

2 ounces chevre
1/4 cup olive oil
1 Tablespoon balsamic vinegar
salt and pepper to taste


You will start by washing, slicing and roasting your veggies. In good weather you can certainly substitute grilling for oven roasting your veggies, but alas, I am without a grill here in my tiny apartment, so slow roasting in my oven is what I had to do. I cut my tomatoes about 1/4" thick, the zucchini about 1/2" thick, and just cut my pepper into about 4 pieces. A very light drizzle of olive oil may be used on top once you arrange your veggies on a sheet pan, as well as a tiny bit of salt and pepper, you don't want to over season at this stage.

TIP: I hate cleaning my pans when I roast things, so I cover them with a layer of foil and just throw all the grossness away off of my pans when I am done.

Heat your oven to 225 degrees and roast your veggies for about 2 hours. You may want to flip your zucchini as it can get pretty dried out if you aren't watching. I always give the zucchini an extra little brush of oil to keep it from drying out.

Once your veggies are done, let them cool for about 20 minutes. You want to be able to get the skin off of your peppers and tomatoes without burning yourself (which will be very easy after slow roasting them by the way, fear not). Remove any skin (it will be shriveled on the outside of your veggies and look rather unappealing anyway) and then dice into your desired size. I generally don't dice up the tomatoes much as they fall apart on their own when stirring everything together at the end.

Prepare your orzo or quinoa according to your package and drain thoroughly. In a separate small bowl, stir together 1/4 cup extra virgin olive oil and 1 Tablespoon balsamic vinegar to form an emulsion. Place your veggies, pasta and dressing together in a serving bowl and toss together. Add salt and pepper to taste, then a sprinkling of chevre. Enjoy!


Wednesday, August 24, 2011

Turn your photographs into Embroidery patterns


Hey everyone! I saw this iphone case online quite awhile ago. If you follow me on facebook, you've seen it already. It got me thinking: "what is the best way to make your own cross stitch patterns from photos you really love? I found this image of poppies in Tuscany, Italy on a stock backgrounds site and I really like it so I thought it would be the perfect candidate to try and turn into something you could cross stitch.

The process I use is pretty basic, all you need is a photograph, and a photo editing program you are comfortable with. I happen to have Photoshop (or rather, my husband does on his computer, and it's what I used in college so it's what I prefer). There are plenty of good photo editing programs out there though, you'll just have to poke around with them to find the tools I used here.

First, open your photo in Photoshop. I generally make a copy of my original image and then paste it into a new document, to make sure I don't accidentally ruin my initial image (Not that this has EVER happened before...). Once you have this new document, feel free to crop your image, adjust levels and do any other image tweaking you want before you turn it into a pattern for embroidery (you may not want all of your flat blue sky, etc). Once I have my image cropped how I like it, Go to your "filter" menu, select the "pixelate" tab, and go to "mosaic". This will break up your image into tiny squares. You can adjust the size of these squares to give as much or as little detail in your final image as you like. Keep in mind, each square will typically make one stitch in your pattern, so the smaller your squares, the more stitching you will be doing.


Here is what you will get once you apply your mosaic filter. As you will see, the image is slightly abstract when compared to the original, but you can still see the basic image. However, it can be pretty hard to differentiate squares from each other. You can deal with this a couple of ways. First, you can enlarge your image making the squares bigger and easier to see. This isn't the best solution, as depending on the original size and quality of your image it may become very blurry when you increase the scale. My method of choice involves using more filters!


Again, go to your filter tab. This time go to the "sharpen" tab. Each image varies a little, but you will likely use some combination of "sharpen", "sharpen edges" and "sharpen more" to define the edges of your squares so you may more easily read your new pattern!


At this point you can print your image onto paper, or if you want to be more green in your crafting, you can move your stitching to your computer desk and use your pattern from the screen (this can be handy as you can zoom in and out if you think it is still hard to follow your squares).

That's all there is to it! I'm sure there are many other people who have similar techniques. If you have any tips I'd love to hear them.

Happy Crafting!


Friday, August 19, 2011

Friday Food Craft: Red Velvet Cake

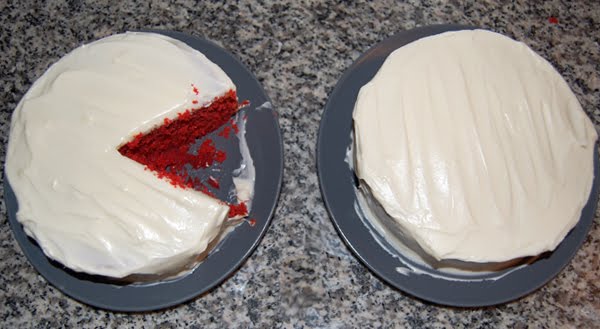
Food craft time! This week's food craft is Red Velvet Cake, and I apologize for the pictures being not all that great, it really is delicious. So delicious in fact, I could not bother to wait until I had decent lighting to eat my yummy cake. I am sure we will all still have a good life despite my photographic shortcomings on this post. This is a yummy classic, and I have seen several variations, but this is the recipe I have come to use whenever I want a velvet cake.

To make your own delicious Red Velvet Cake at home you will need:

1 cup unsalted butter, softened
1 3/4 cups sugar
2 1/2 cups flour
1 1/4 teaspoons salt
2 eggs, room temperature
1 cup buttermilk
1 teaspoon vanilla
1 teaspoon baking soda
1 1/2 teaspoons vinegar
2 Tablespoons Red food coloring
2 teaspoons cocoa powder

To start, preheat your oven to 350 degrees, and prepare your cake pan(s). Two 9 inch pans is generally the standard*. Butter and flour them so you final cake doesn't stick. Set these aside.

Cream together your butter and sugar, set this aside. In one bowl, mix together all of your dry ingredients. In a second bowl, mix together all of the wet ingredients (I generally beat my eggs a little first before adding everything else).

Once you have your wet and dry bowls of ingredients start adding them to your butter and sugar in several alternating additions. First add 1/3 of your dry ingredients, then 1/3 of your wet. Mix your batter slowly and as soon as it is incorporated do you next addition until everything is mixed together.

Pour batter into your pans (you may need to smooth the top out evenly, this is a fairly thick batter).

Place into oven on center rack and bake for 20-25 minutes, or until a cake tester inserted comes out clean.

*Baking time will vary depending on size of your pans, if you use 8 inch round pans it will likely be closer to 25-30 minutes, a sheet pan will be closer to 20 minutes. Be sure to check with a toothpick or knife to make sure it is done before removing from the oven.

Cool in the pans on a cooling rack for 10 minutes, then remove from pans and allow to fully cool. Frost and enjoy!


Cream Cheese Frosting:

1 stick (1/4 cup) unsalted butter, softened
1-8oz. package cream cheese, softened
1 1/2 teaspoons vanilla flavoring
2 cups confectioner's sugar

Beat together butter, cream cheese and vanilla flavoring until smooth. Sift your powdered sugar and mix well until incorporated. Refrigerate for 5-10 minutes before frosting cake to firm up frosting (you could also add a little extra confectioner's sugar if you prefer).


Enjoy!


NOM NOM NOM