Monday, November 28, 2011

Accordion Fold Bow


Today's bow(s) are super simple and can be made any size. If you feel like busting out some sewing skills, you can also make these from fabric (you might want a little interfacing on larger ones to help them keep a crisp shape though)! The best part is that you can alter these to make your accordion bow into a snowflake bow and then every bow is different!

To start, select your paper or fabric (to get nice crisp folds in your end product and assure that it will spread nicely once open, I recommend using thinner paper rather than a card stock. Magazine paper or gift wrap would be perfect as it allows your paper to move pretty freely.

I always use the ratio of one inch wide for every three inches long when cutting my paper into a strip to be folded. The bow seen here is 4 inches wide, so I used a strip of paper 12 inches long.

If you want a "perfect" looking bow, you can measure out inch increments on the back of your bow or score fold lines so each fold is the same size. Then, fold your paper back and forth to make this accordion folded strip (I always fold my accordion an even number of times, so both "ends" are folded with the pretty side facing out and the plain side facing inwards so no one sees it in the final bow.):


Once it is folded you will want to staple it in the middle (or sew if using fabric), and then spread out your little folds to make a circular bow. Secure your ends together with glue, tape or another staple and you will have this:


A little Plain Jane for your taste? Once you have stapled your accordion folded paper in the middle, feel free to cut out some shapes as if you were making a paper snowflake. Here is my accordion folded paper, stapled, with cut outs:


You could use pinking shears or other decorative edged scissors to add a little more "oompf" as well. Again, using a thinner paper aids dramatically in being able to cut out your shapes.


When you spread out and fasten the edges of your snowflake together now you will get a bow that looks like this:


There you have it! Again, this is a great way to start out making bows in an assembly line type of way, but end up with a bunch of great unique bows by cutting out different shapes!


Friday, November 25, 2011

DIY: Small Gift Bows


Here is another great gift bow tutorial! These are a little bit easier to make than my Jumbo Gift Bows due to the smaller, more manageable size. They are also a great option because you can use almost any paper to make them! All of the bows you see here were made from pages out of a magazine. Holiday ads have great colors and images to make gift bows from. You could also use scrap booking paper, newspaper, gift wrap, or even get some rolls of ribbon at the fabric store and use it to make these decorative bows without having to cut strips yourself!

To make the bow seen at the top of the page you will need to start by selecting a full page out of a magazine and cutting it into strips:


For this bow I cut my page into 7 strips, all 3/4" wide as seen above. The first 3 are the entire length of the page. The second 3 have each had 1.5" removed, and the shortest strip is 4.5" long.


Next, you will make your loops into figure 8 shapes by looping your paper. Take one end and loop it in towards the middle like so:


You will notice that you want to loop it so that the "wrong side" of your paper is facing up on both the center of your bow, as well as the end you looped towards the middle. Loop the other end towards the middle as well, and you will end up with a finished loop of your bow that looks like this:


Secure your bow loops in the center with glue, double sided tape or a staple. You will make your 6 largest strips into the figure 8 loops as shown above, and the smallest strip will be made into a regular, circular loop. Once all of your loops are made you will have this:


Now your bow is ready to assemble! Take your 3 largest loops and arrange them to make the bottom of your bow. You can stick them together however you like, I chose to use glue. The type of glue you choose will depend on your material. I found this adhesive chart on Pinterest that is helpful if you aren't sure what type of glue works with your materials. Once you glue these 3 loops together you will have this:


Arrange and assemble your 3 other figure 8 loops in the same way and then glue them together. This will then be glued to the center of the bottom of your bow. Glue your circular loop down in the center to finish your bow!

Here is one I made out of some holiday cookie images from a cooking magazine (who doesn't want their present wrapped in chocolate macarons and cherry pistachio nougat?):


Here is another bow I made from magazines as well, it doesn't have a full tutorial, but is very similar to the jumbo gift bow. It is made from 1/2" strips: 5 of the bottom, 4 in the second layer and 2 circular loops to finish the center (lengths are the same as above for each layer).


Friday Food Craft: Mounds Bars


Hey all, it's food craft time again! Everyone has their favorite treat on the cookie tray around the holidays, and this is mine. It combines the chocolate and coconut flavors of a Mounds candy bar with a super yummy graham cracker crust, and when I was little I would make sure that I got more than my fair share off the cookie tray, Santa never got to have these. Poor old elf.

When I was little I had always assumed that some great magic must be how they tasted so good, but in reality they are incredibly easy to make, and dare I say it, you'll never want to eat a Mounds candy bar ever again after you've had these, they make a Mounds bar look like a slow ride to grandma's house. I'm going to credit the graham cracker crust for this.

To make some tasty Mounds bars for yourself this holiday season you will need:

For the graham cracker crust:
10 whole graham cracker "sheets" (in every box I've ever had this is, annoyingly, one sleeve plus one cracker sheet from a second sleeve)
1 stick of unsalted butter, melted
1/4 cup packed brown sugar

For the coconut filling:
3 cups flaked coconut
1 (14oz.) can sweetened condensed milk

Chocolate topping:
3 cups chocolate chips


Start by mixing your coconut and sweetened condensed milk filling together and leaving it in a bowl. This helps all of the coconut absorb the milk and get a nice even texture. Set aside while preparing the crust.

Preheat your oven to 325 degrees. To make the graham cracker crust, I always use the tried and true method of putting my graham crackers in a large zip sealed plastic bag and thumping it with a rolling pin to make crumbs. There is something very satisfying about pulverizing graham crackers in the name of delicious baked goods, but if you prefer the food processor approach, be my guest. Once you have your graham crackers reduced to crumbs, add in your brown sugar and stir a little to get an even mixture and then add in your melted butter. Try to get the butter to coat all of the graham cracker and sugar bits so it will hold together in the pan. Once mixed to your liking, dump your crust mixture into a 9"x13" pan and gently pat down. You will bake this layer at 325 for 10 minutes. Remove from oven and allow to cool slightly.

Once cooled about 5-10 minutes, add your coconut layer on top and spread evenly over the crust. I generally drop large spoonfuls of the coconut mixture evenly over the crust and then use an offset spatula to smooth them together into each other. The coconut mixture is pretty sticky, so you want to spread gently as to not pull up a bunch of graham cracker crumbs into the coconut and make a big mess.

After your second layer is spread evenly, pop your bars back into the oven for 15 minutes, still at 325 degrees. Your coconut will likely be slightly browned around the edges of the pan, this is a good thing. Those are my favorite bars out of the whole pan! Set bars on a cooling rack and melt your chocolate layer. This can be done in the microwave or on a stove top with the use of a double boiler. I opt for the microwave method most often. Simply put your chocolate chips in a microwave safe bowl and heat at 30 second intervals, stirring between each interval. Once your chips are almost all melted, I switch to 10 second intervals. Melting my chocolate chips generally takes a total of 1 minute 30 seconds- 1 minute 50 seconds (sometimes I add a few extra chocolate chips so it takes longer). Stir well to make sure there are no lumps, then spread over the coconut layer of your bars.

Allow to cool to room temperature, then refrigerate. I store these in the refrigerator, but you can also freeze them if you are doing a lot of holiday baking all at once, they freeze for storage beautifully. If you feel like adding some fun decorations, you can add your favorite sprinkles on top of the melted chocolate layer, my mom usually did. The best part: these are great at room temperature or straight out of the fridge!

Enjoy!


Wednesday, November 23, 2011

DIY: Jumbo Gift Bow


Welcome back, or to you first time visitors, welcome! For those of you who have not yet entered, take the opportunity to check out my Happy Haulidays post and comment for your chance to win $500 in books from Chronicle Books. I think I put together a pretty great list of crafting, baking and children's books to make anyone's holidays brighter!


With holiday shopping season well upon us, I thought I would break out some DIY tutorials on gift wrap! This Jumbo Gift Bow is made from wrapping paper (about 28 inches wide, yours may be slightly wider or skinnier depending on the roll you use). These bows are great for larger packages, or those large oddly shaped presents that often times a large bow is good enough to use as wrapping all on it's own (things like wagons, bikes, etc.).


To start, select your wrapping paper. I am using some wrapping paper I got last year at IKEA. I think my husband and I bought it because we had never seen such "busy" and hideously gorgeous wrapping paper before in our lives. Blue snowflake background with bright red reindeer? Yes, please.


Next, cut your paper into 7 strips. Mine are all 3 inches wide. You will want 3 strips that are the same length as your roll of wrapping paper, 3 that all have the last 4 inches removed, and finally one strip that is about 12 inches long.


Once your strips are cut, you may use tape or glue (I used scotch tape for this tutorial, but I generally like to use glue sticks as they dry quickly and don't crinkle the paper like liquid glues can) to make "loops". Make sure that you have the same amount of overlap on each loop, to ensure they stay the same length. Each one of my loops has about 2 inches of overlap. I keep my taped/glued edge on the bottom of my loop, in the middle where they will all finally be glued together.


Arrange your 3 largest loops, spaced evenly, on the bottom of your final bow. If you like you can cut out a circle of card stock to use as a base, but that isn't necessary. Once you have your bottom layer arranged and glued the way you like, do the same with your 3 smaller loops. Glue these on top of the larger loops, and finish by placing your one small loop in the center and gluing it down. Attach your bow to some ribbon and tie it to your present, or use glue to attach to wrapping paper. :)


I will have more tutorials coming up for other styles of bows, tags and methods of gift wrapping so come back and check it out all this week/weekend!


Friday, November 18, 2011

Friday Food Craft: Chai Concentrate


I love drinking chai. Nevermind the fact I have never been a coffee person, tea just generally tastes better to me. Chai even more so as it is spiced and added to equal parts milk to create a yummy latte that makes you forget its cold and rainy. I've seen lots of variations on making your own spiced chai concentrate, and this is mine :) I hope you enjoy it!

To make your own spiced chai concentrate you will need:

4 1/2 cups water
1/2 cup sugar
1 teaspoon vanilla extract
3-4 slices dried ginger (I rarely use ginger so I have dried sliced ginger in my pantry, if you want to use fresh which I am sure would be AWESOME, you will need 3 small chunks rather than slices)
10 whole cloves
1 cinnamon stick
1 small slice of orange peel
1/2 teaspoon all spice
1/4 teaspoon ground cardamom
9 tea bags of your favorite black tea

Bring your water to a boil in a large pot and add in your sugar and vanilla extract. I like to do this first so the sugar fully dissolves (and the vanilla makes it smell yummy!). Reduce your heat to a simmer and add in your ginger, cinnamon, cloves and orange peel, as well as your ground spices.

*I happen to have loose tea bags that I use to put my ground spices in so I can remove them when my tea is done steeping, but if you don't you can always strain all of your bits out through a cheesecloth at the end.

Let your spices simmer in your water for about 20 minutes, then add in your tea bags and allow to steep for an additional 5 minutes. Remove all of your bags and spices and pour into container of your choice. Store in refrigerator. To serve, pour 1/2 cup concentrate and 1/2 cup milk together into microwave safe cup and heat to desired warmth. Yum!


Wednesday, November 16, 2011

Once More, With Feeling


What's this? A new crochet hook and yarn? What ever could have caused this? I know I have blogged before about my complete inability to follow patterns and hence successfully crochet much, but I saw this awesome tutorial from Crocheting the Day Away on Pinterest and I figured since I had never tried Tunisian crochet before I would give it a try. It looks easy enough, and the tutorial is really good with lots of photos (my best friend in crochet world).


Doesn't that stitch look awesome? It's sort of a cross between knitting and crochet, I have never knitted in my life so I'll report back to you on how it goes. I was just too excited to share my project (hopefully a striped scarf) that I had to share so you could all try this out too if you feel the need.

UPDATE: Here is my work in progress!


I have to say, I am quite impressed with myself, just goes to show what an amazingly easy to follow tutorial this is, very well done Mary!!

Once again, Pinterest has proven itself to be a great source of inspiration and great tutorials. It really is an awesome site, and again if you want an invite shoot me an email (craftinomicon@gmail.com)and ask for an invite! :)


For more inspiration don't forget to check out the Happy Haulidays post to see some great books from Chronicle Books and comment for a chance to win!


Happy Haulidays!


With Christmas fast approaching, I know many of us have gift giving and the buying of all these gifts on the mind. I, like many others, also use this time of year to give back to charities in as many ways as I can. Luckily, while I was going about my gift browsing I saw this contest on Chronicle Books' website.

Happy Haulidays is giving a chance for one blogger to win up to $500 in their books! Not only that, they will donate $500 of their books to the blogger's charity of choice. Oh, and did I mention the winning blogger will be able to give $500 of their books to a commenter on their post?

It's a win-win-win situation! For those of you unfamiliar with Chronicle Books, they make some very unique books on several topics (including crafts and baking--two of my favorite things!). To get your chance at winning $500 in Chronicle Books titles, simply leave a comment on this blog post, and let your friends know that they can win as well by commenting, and keep your fingers crossed for me to win! I have selected The Children's Book Bank located right here in Portland, OR as my charity of choice for this contest. They provide books to children in low income areas who may otherwise not have any. Please visit their site to find out more about this great organization, and I encourage you to find a similar local charity to donate to this holiday season.

Now on to the books! What exactly might we all be winning? I have a list a mile long but my wishlist includes the following titles:


1-2-3 Sew


Holiday Crafting and Baking with Kids


Instant Iron Ons


Every Day's a Holiday


Curiosities


Whip Up Mini Quilts


Denyse Schmidt Quilts


Flour


Tartine


Wookie Cookies


Tartine Bread


Garden Anywhere


Apartment Therapy Presents: Real Homes, Real People, Hundreds of Real Design Solutions


Penny Saving Household Helper


Over and Under the Snow


I Love Color


His Shoes Were Far Too Tight


Chicken Big


Alice's Adventures in Wonderland


Pattern Making


World of Geekcraft


Ten Little Zombies


Whew! That's one heck of a list! As you will notice, despite my not having kids I did put some children's books on my wish list. Should I win, I would be donating those to charity as well. Good luck to us all and again, tell your friends to come comment to get their entry in. Visit the Chronicle Books website for more info on their books and the contest! Can't wait to get your hands on some of these books? Chronicle currently has a Friends and Family sale going on through November 30th:


Sunday, November 13, 2011

Food Craft: Candy Cane Coffee Cakes


This is a great breakfast dish for Christmas morning. The best part: you can make it ahead of time and just pop it in the oven to bake while presents are being opened. Another great thing: it looks pretty fancy but is actually quite easy to achieve! My mom used to make a coffee cake similar to this when I was younger, I have no idea where she got the recipe but it was pretty tasty, so here is my version. :)

To make this "candy cane" coffee cake you will need:

For the filling:

2 cups cherries, drained (I used Dark Morello cherries from Trader Joe's. My mom used to use maraschino cherries. Both will do just fine)
3/4 cup dried apricots
1/8 teaspoon cinnamon
1/8 teaspoon ground nutmeg
1 pinch salt

Drain you cherries well and check for pits, remove any you may find. Place cherries into your food processor along with your dried apricots (I tend to use a kitchen shears to cut my apricots up a little first) and your spices. Pulse together until well combined. It should still have some fruit chunks, not look like jelly. Cover and refrigerate until ready to use.

For the dough:

1 cup warm milk
2 1/2 teaspoons active dry yeast
1/2 cup sugar
1 teaspoon kosher salt
4 tablespoons unsalted butter (1/2 stick), room temperature (you can microwave to soften, it's ok if some is melted)
1 egg
4 cups flour (plus a little extra for your counter tops when kneading)


Start by warming your milk. This can be done in a microwave or in a small saucepan on your stove top. It should be around 108-110 degrees, too hot and it will kill your yeast (not a yummy thing). Put your milk, yeast, sugar and salt in a bowl (or stand mixer) and mix it together a little bit, let stand for about 5 minutes.

Next, add in your butter and egg, plus one cup of your flour. Mix this together until your egg and any butter lumps are worked into the dough (sometimes I just melt all of my butter to avoid the lumps altogether). Then add in the rest of your flour and mix until it has come together. Remove onto a floured surface and knead by hand for a couple minutes, if your dough is too sticky you can add a bit more flour.

Place dough into a greased bowl and cover with a tea towel and allow to rise for an hour, or until it has doubled in size. Punch down, and allow to rise another 30 minutes before rolling.

Separate your dough into 2 pieces (this makes 2 coffee cakes, you can make one larger one, but it is easier to move them on and off pans, etc. if you make 2 smaller cakes). On a floured surface, roll out each piece of dough into a rectangle (or close to it, mine are always just long ovals) about 1/2" to 1/4" thick. Then, using a clean kitchen shears, cut strips into each side about 1/3 of the way into the dough. You will want to make sure each side has the same number of strips. Your dough will look a bit like this:


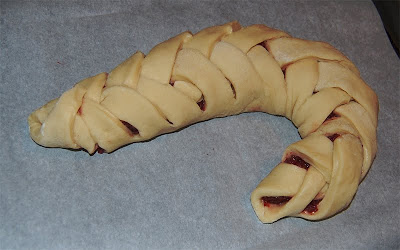
You will spoon half of your cherry/apricot filling onto the center of each coffee cake and spread evenly. Now, "braid" your dough closed. Start at one end and fold one strip over the filling, followed by a strip from the opposite side over the center and continue until you have your braided "log" of dough. Then, to make the candy cane shape, arrange your coffee cake on a sheet pan and gently pull and turn the dough to curve one end. You will have something like this:


You may now cover well and refrigerate until baking Christmas morning, or preheat oven to 375 degrees and bake for about 20 minutes, until the dough is golden brown.

I typically rub a little butter over the top of my coffee cakes as soon as they come out of the oven, but it is not needed.

Then, mix up a simple glaze of confectioner's sugar and water (about 1/2 cup powdered sugar to 1 Tablespoon water) and drizzle this over the top of your warm cakes. Serve warm or cold, this makes a great breakfast or afternoon snack :)